
Bybit Trading Starter Pack: How to Get Started With Bybit Derivatives

The Bybit Trading Starter Pack provides a comprehensive guide on how to get started with trading Derivatives on Bybit. The pack covers various topics, including creating a Bybit account, funding the account, understanding the Bybit Derivatives trading interface, adjusting leverage, closing trades and exploring Bybit’s trading tools.
Key Takeaways:
To trade on Bybit, users must create an account using either their email address or mobile number.
After setup, users can fund their accounts by depositing cryptocurrencies or purchasing crypto directly on Bybit.
Bybit offers a user-friendly interface for trading various Derivatives products, including futures, forwards, options and perpetual swaps.
Traders can choose leverage options, place trade orders, adjust leverage levels and utilize tools such as mark price and last price for assessing trades. Closing positions can be done through market orders or limit orders.
Chapter 1: How to Create a Bybit Derivatives Account
_1600x1920_copy.png)
Before you can start trading Derivatives on Bybit, you first need to create an account. There are two primary ways: using your email address, or your mobile phone number.
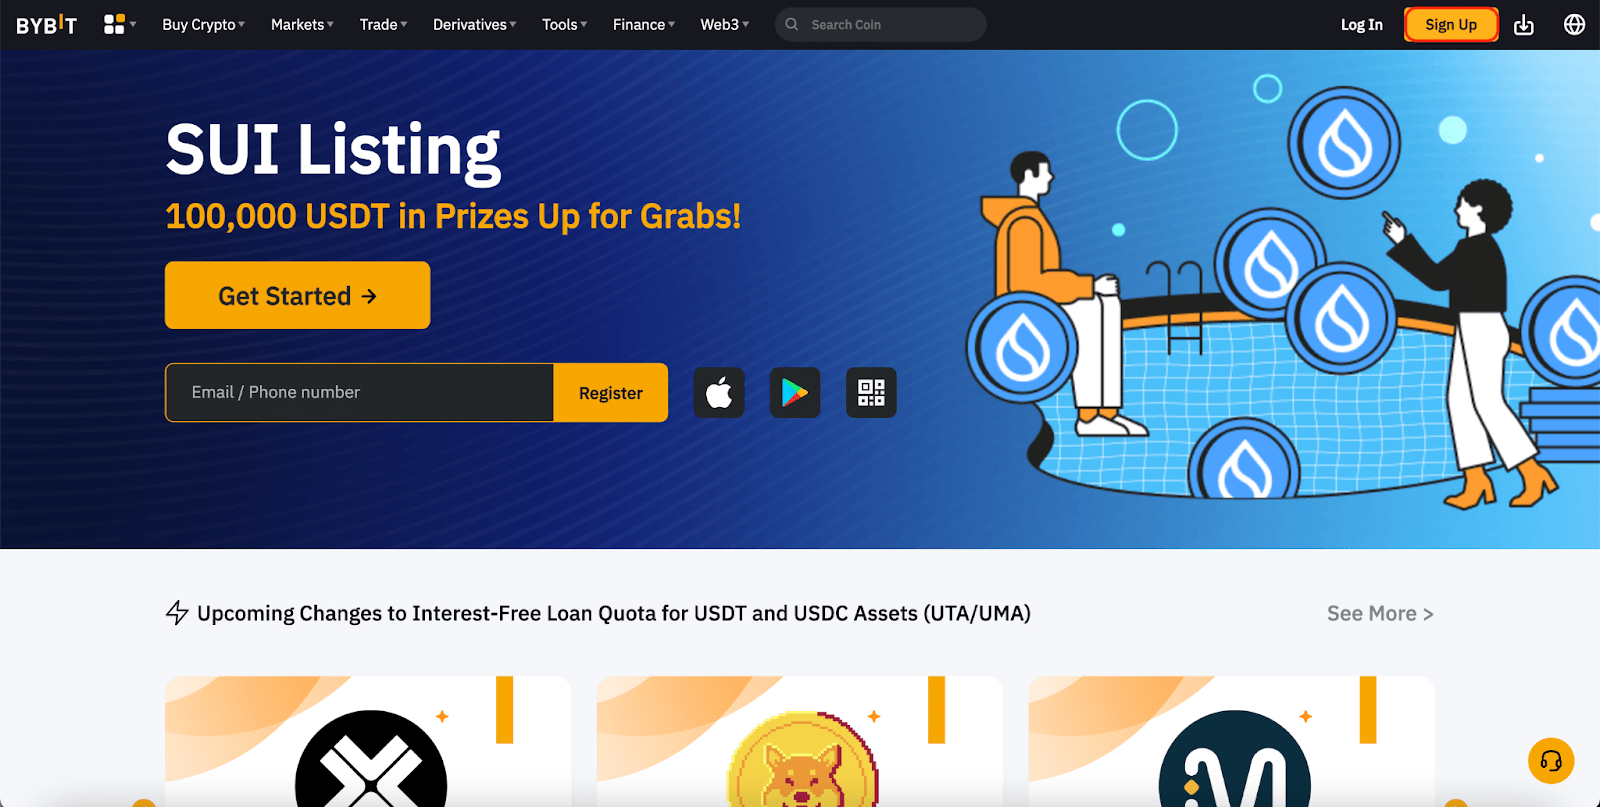
Chapter 1a: Signing Up on PC/Desktop
Step 1: Click on the Sign Up button on the top right corner of the Bybit home page.
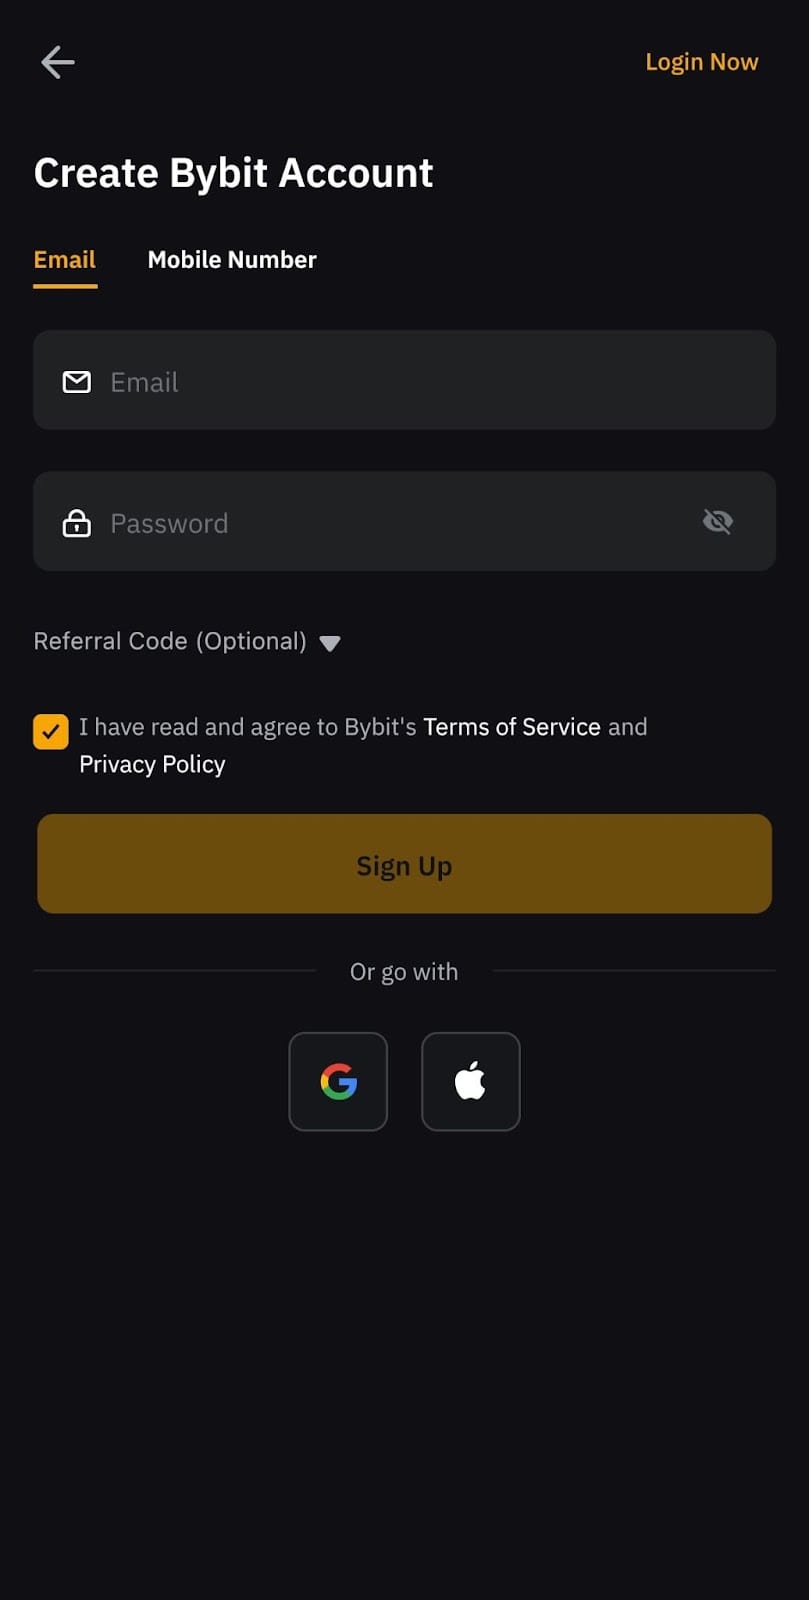
Step 2: Choose your preferred method of signing up: Email or Mobile. Then, input the necessary details accordingly.
Note that the Referral Code field is optional, and can be left blank.
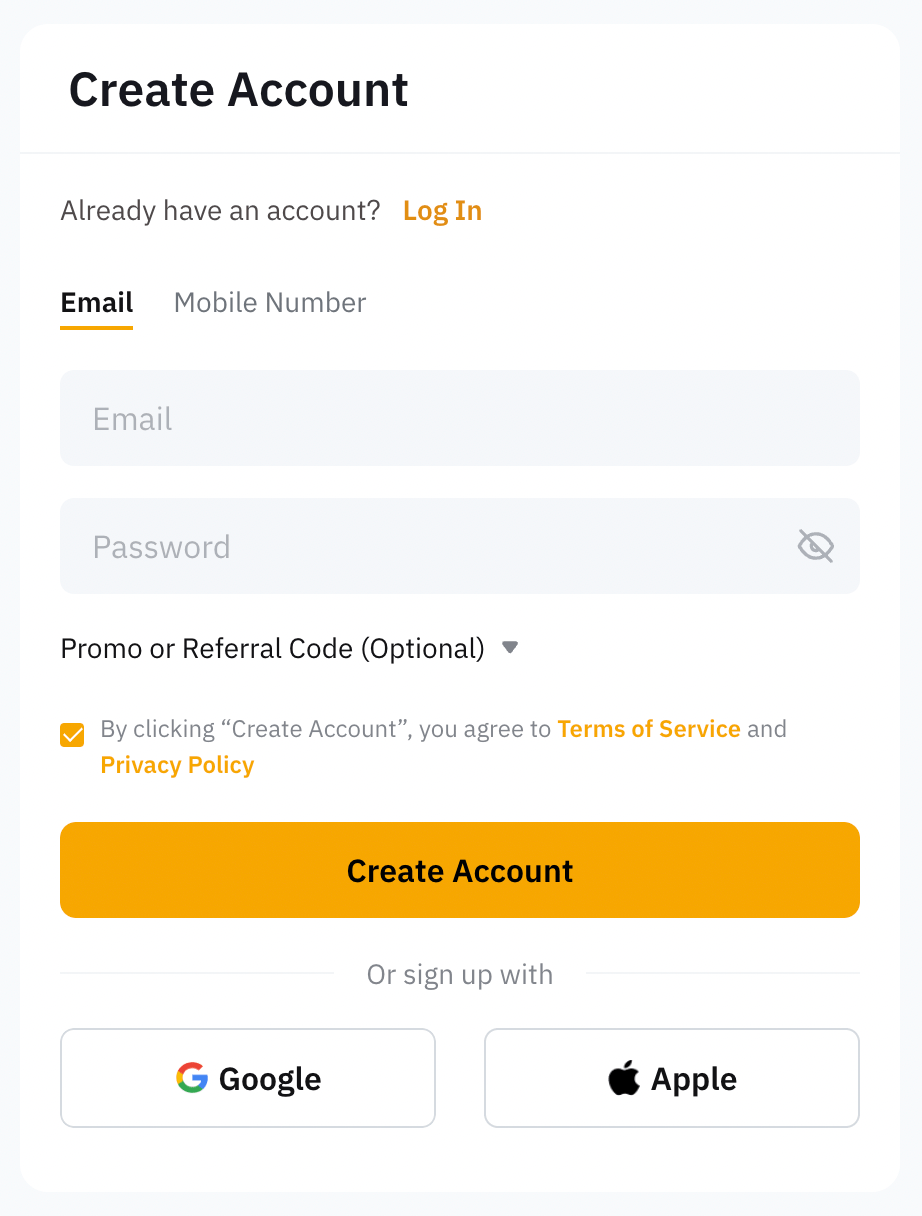
Step 3: Click on Create Account after reading and agreeing to Bybit’s Terms of Service and Privacy Policy. A window that shows a list of restricted countries and regions will pop up. If you’re not from any of the countries listed, click on No to continue.
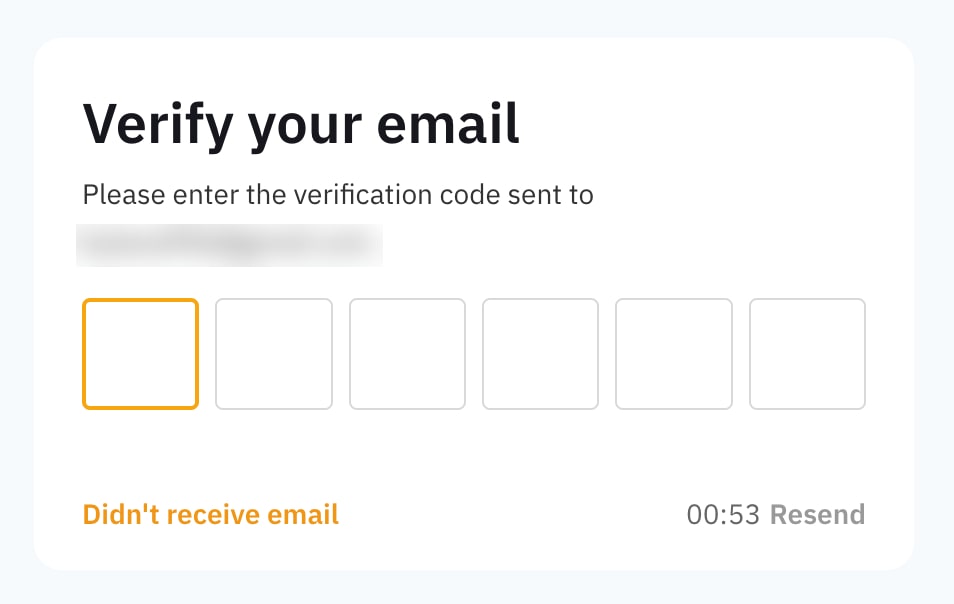
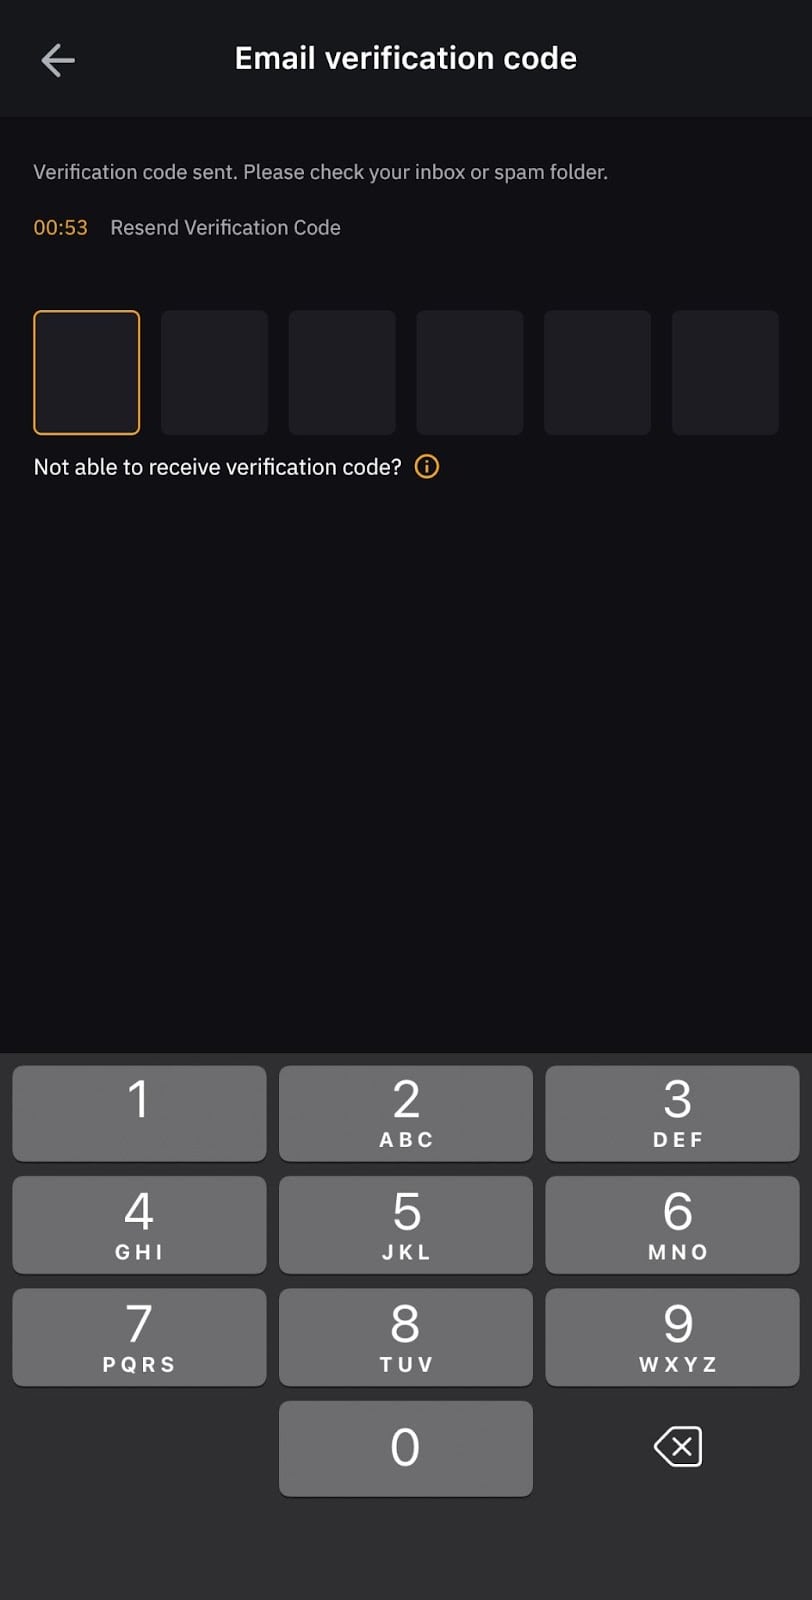
Step 4: Complete the reCAPTCHA verification and enter the verification code that you’ve received based on your preferred method of registration.
If you’ve selected Email, you’ll receive the code in your email inbox or spam/junk inbox. If you’ve selected Mobile, you’ll receive an SMS code on your mobile device.
Chapter 1b: Signing Up on Mobile
Step 1: Download the official Bybit App from the Apple App Store or Google Play Store. Then, launch the Bybit App and tap on Assets at the bottom right corner.

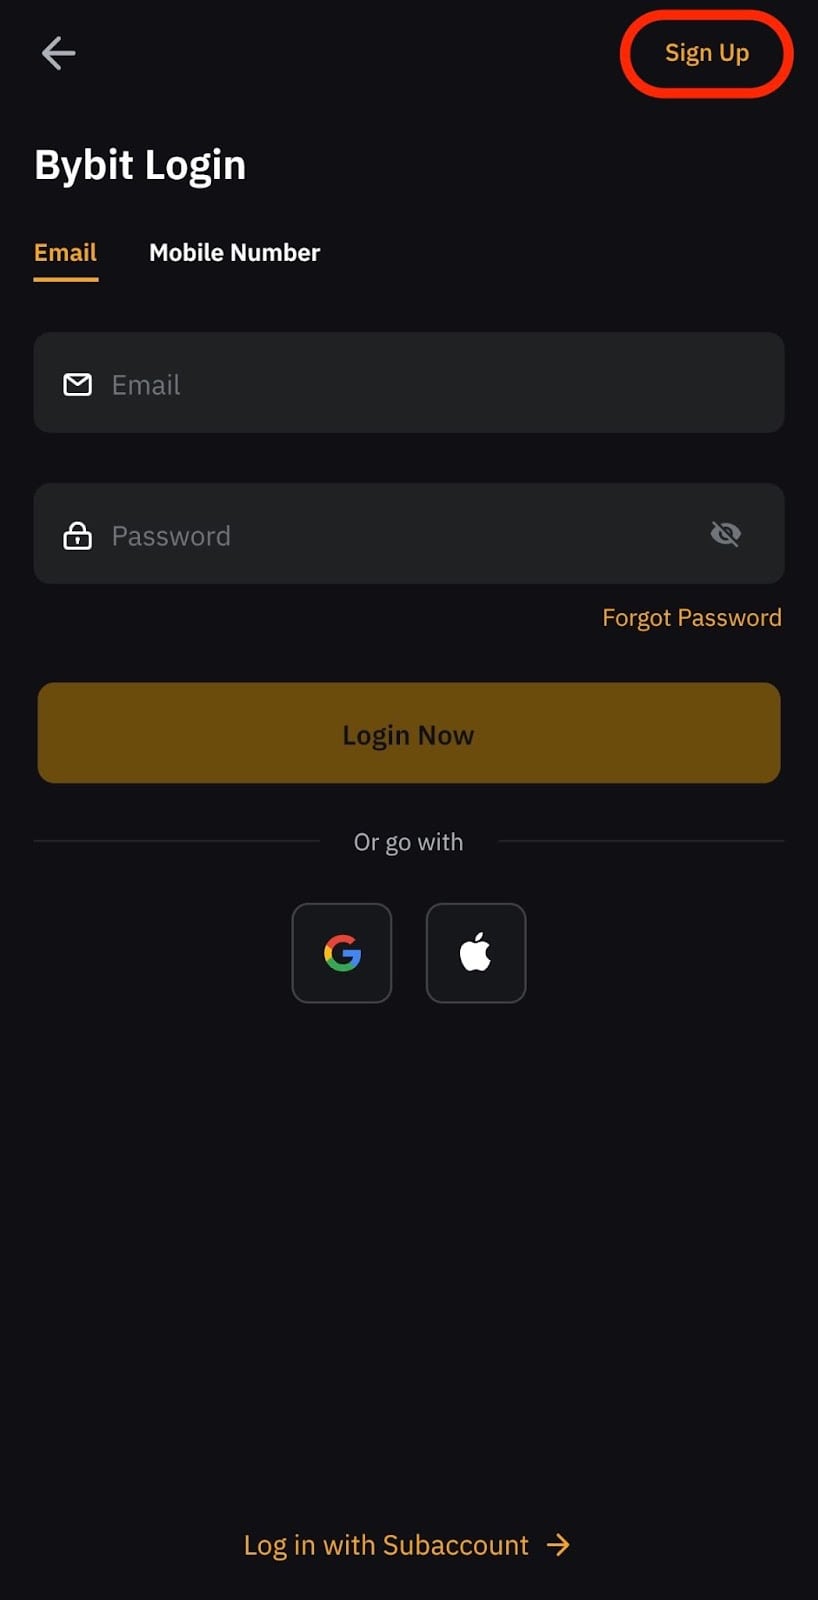
Step 2: Select the Sign Up button from the upper right corner.
Step 3: Choose your preferred method of signing up: Email or Mobile. Fill in your details, and tap on Sign Up.
Note that the Referral Code field is optional, and can be left blank.
Step 4: A window showing a list of restricted countries and regions will pop up. If you’re not from any of the countries listed, select No.
Step 5: Complete the reCAPTCHA verification and input the verification code that you’ve received based on your preferred method of registration.
If you’ve selected Email, you’ll receive the code in your email inbox or spam/junk inbox. If you’ve selected Mobile, you’ll receive an SMS code on your mobile device.
Chapter 2: How to Fund Your Bybit Derivatives Account
_1600x3931.png)
Now that you’ve signed up for your account, you’re almost ready to start trading Derivatives on Bybit. But first, here’s a detailed guide on how you can fund your Bybit Derivatives Account.
Chapter 2a: Depositing Crypto on Bybit
If you already have funds in an external crypto wallet or on another exchange, you can choose to deposit crypto into your Bybit Derivatives Account through a blockchain transaction. However, please be aware of the following:
Please only deposit the supported coins using the supported chain listed on the Bybit Asset page.
Bybit currently only supports direct transfer. Please do not transfer your assets using the Smart Contract method.
For coin deposits that require a deposit tag/memo, kindly be sure to fill in your deposit memo/tag correctly. You can find your memo/tag from the deposit window. Depositing without a memo/tag or with the wrong memo/tag may lead to the loss of assets. For more information, please refer to Bybit Deposit FAQ.
Depositing Crypto on PC/Desktop
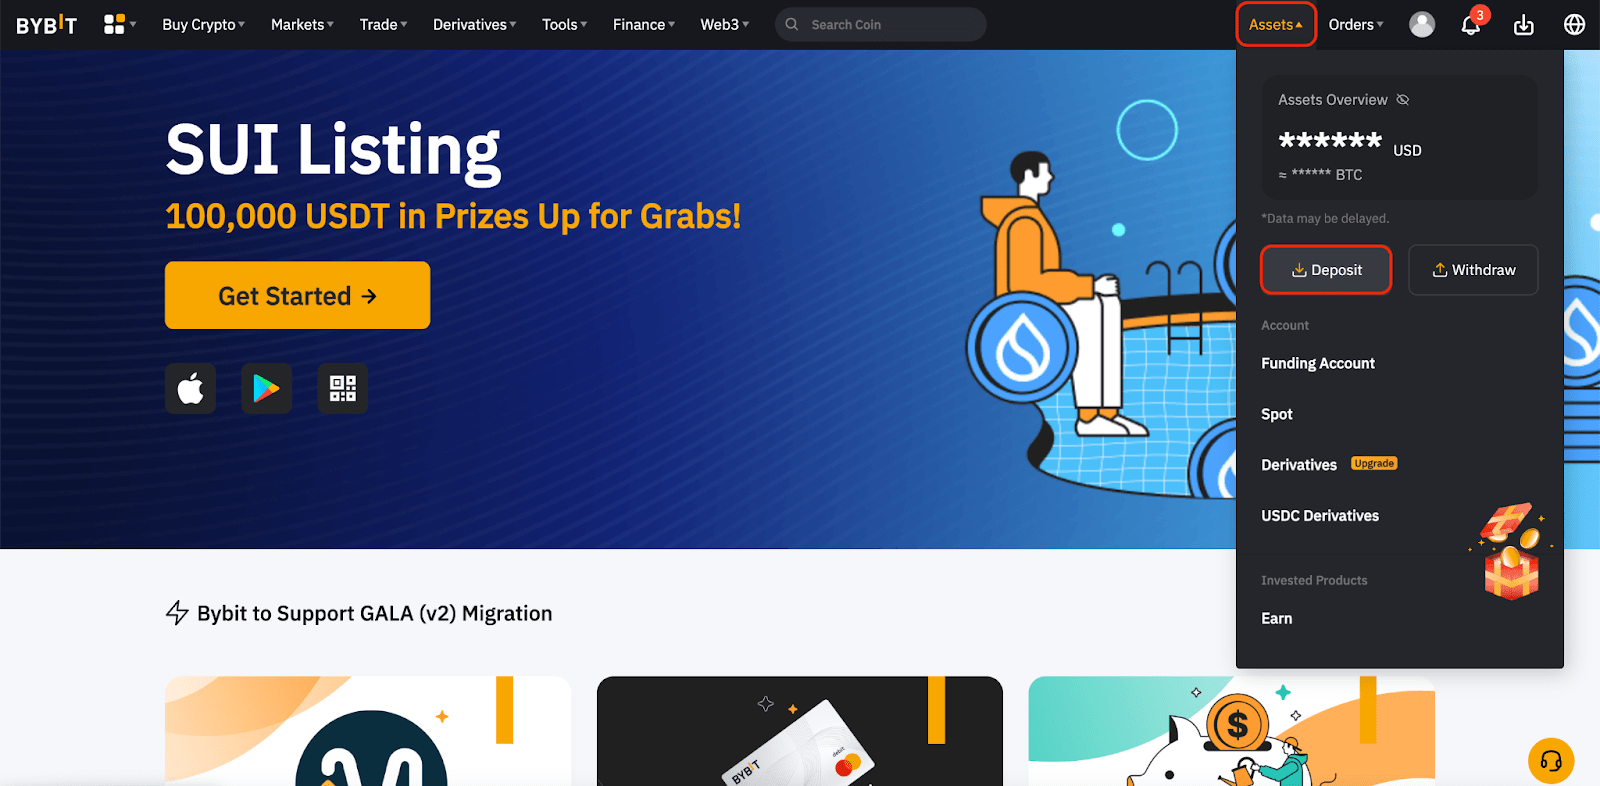
Step 1: Once you’re logged into your Bybit account, hover your cursor over the Assets tab on the top right corner of the Bybit home page. Then, click on Deposit.
Step 2: Choose the coin that you would like to deposit.
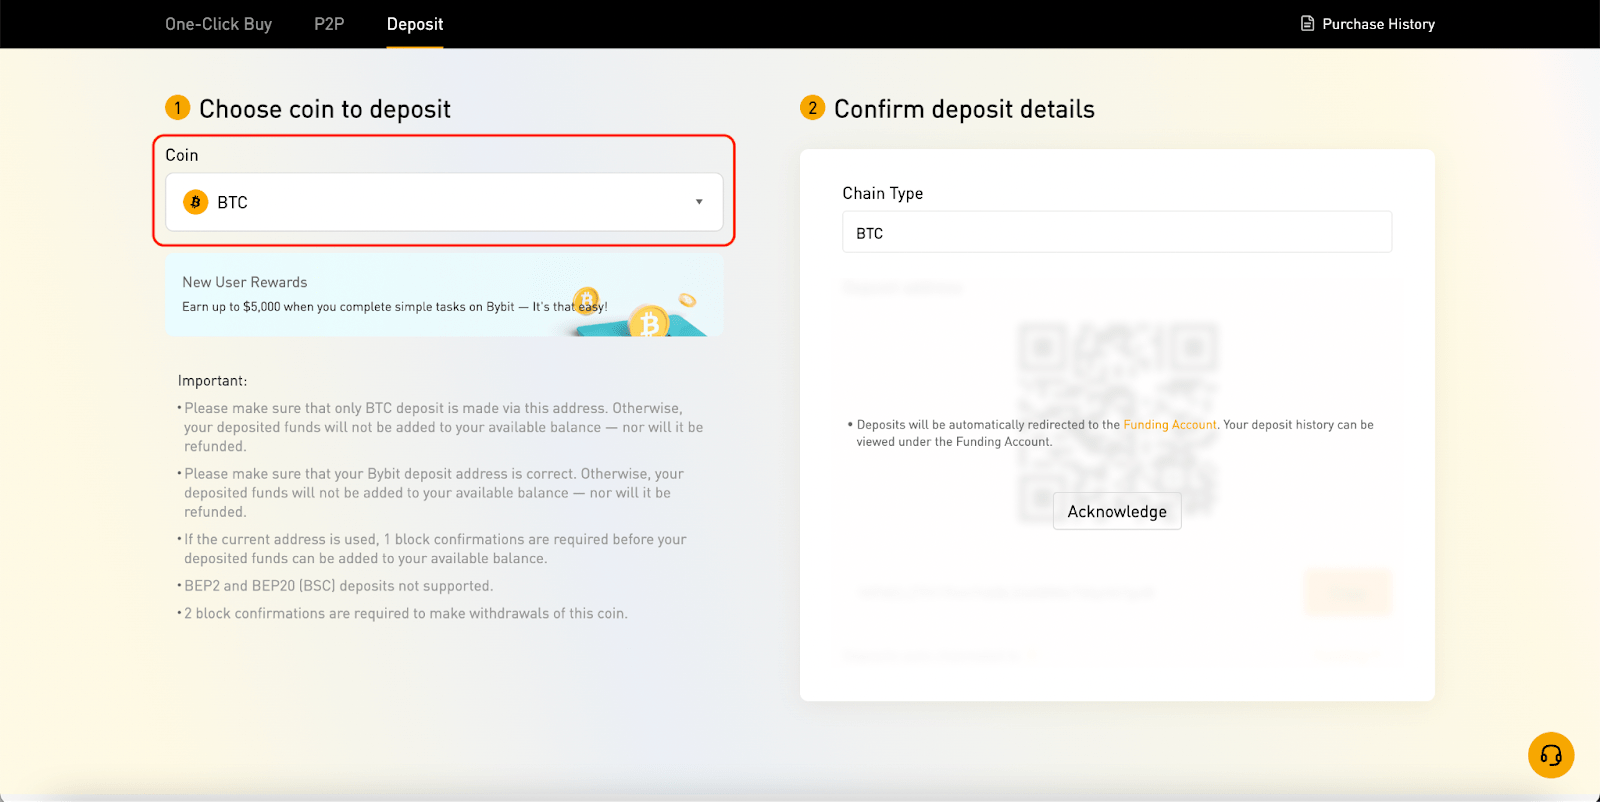
Step 3: Select the chain type for the coin you would like to deposit. Then, make sure that the Deposits auto-channeled to the field indicated as Derivatives.
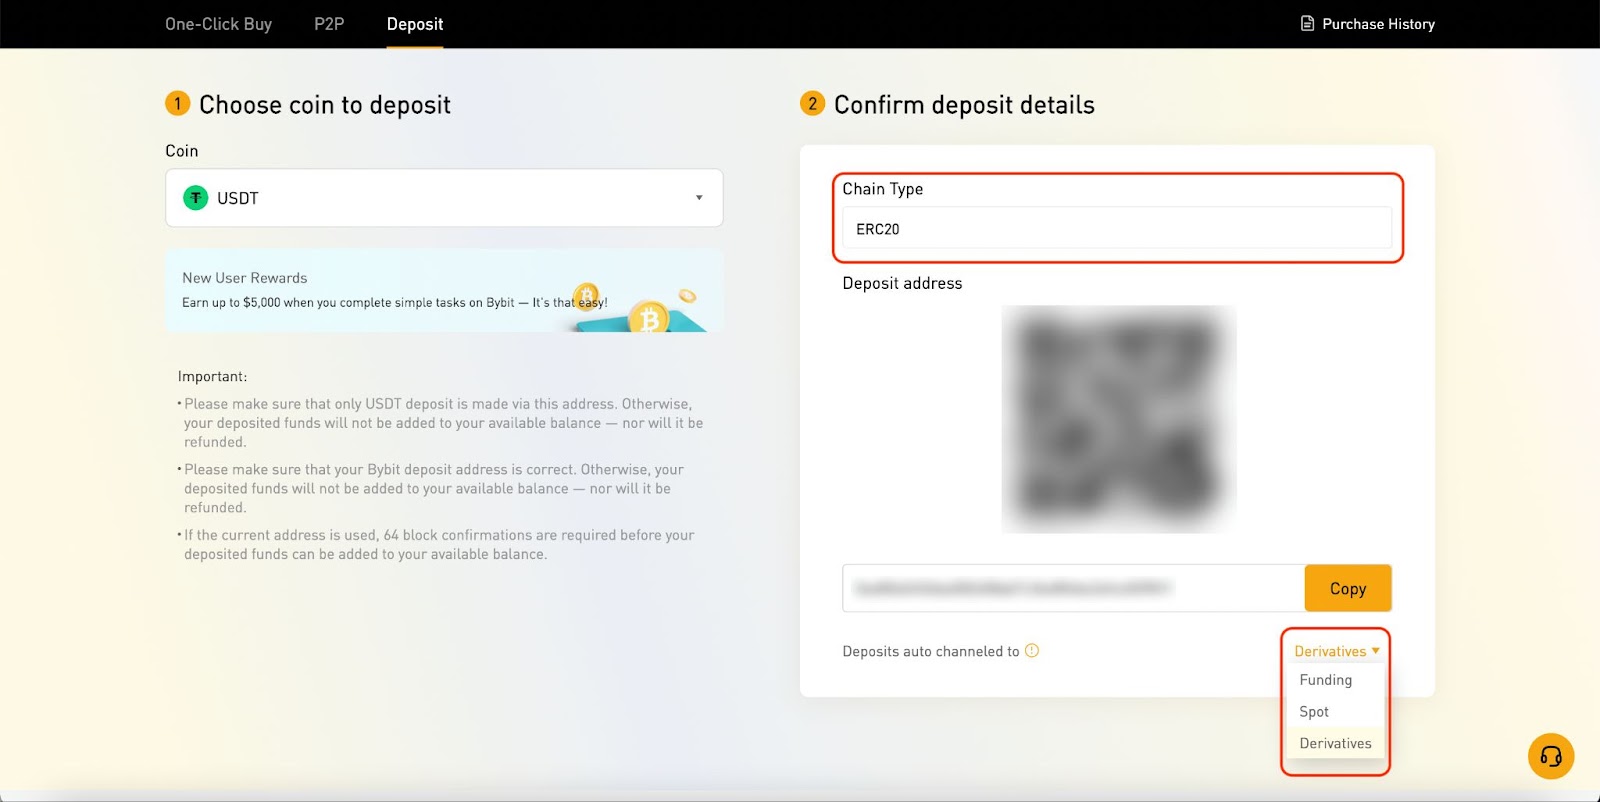
Step 4: Once you’ve confirmed the details, you can proceed to scan the QR code or copy the deposit address and use it as the destination address.
Depositing Crypto on Mobile
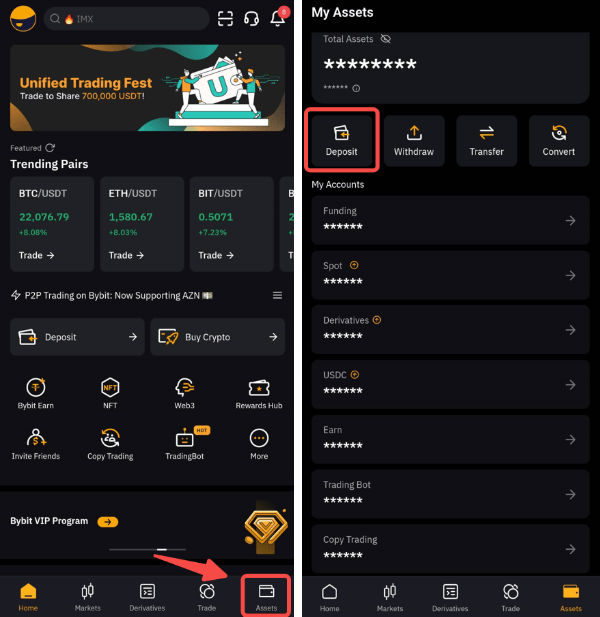
Step 1: Once you’re logged into your Bybit account on the Bybit App, tap on Assets (located on the bottom right corner of the screen) and select Deposit.
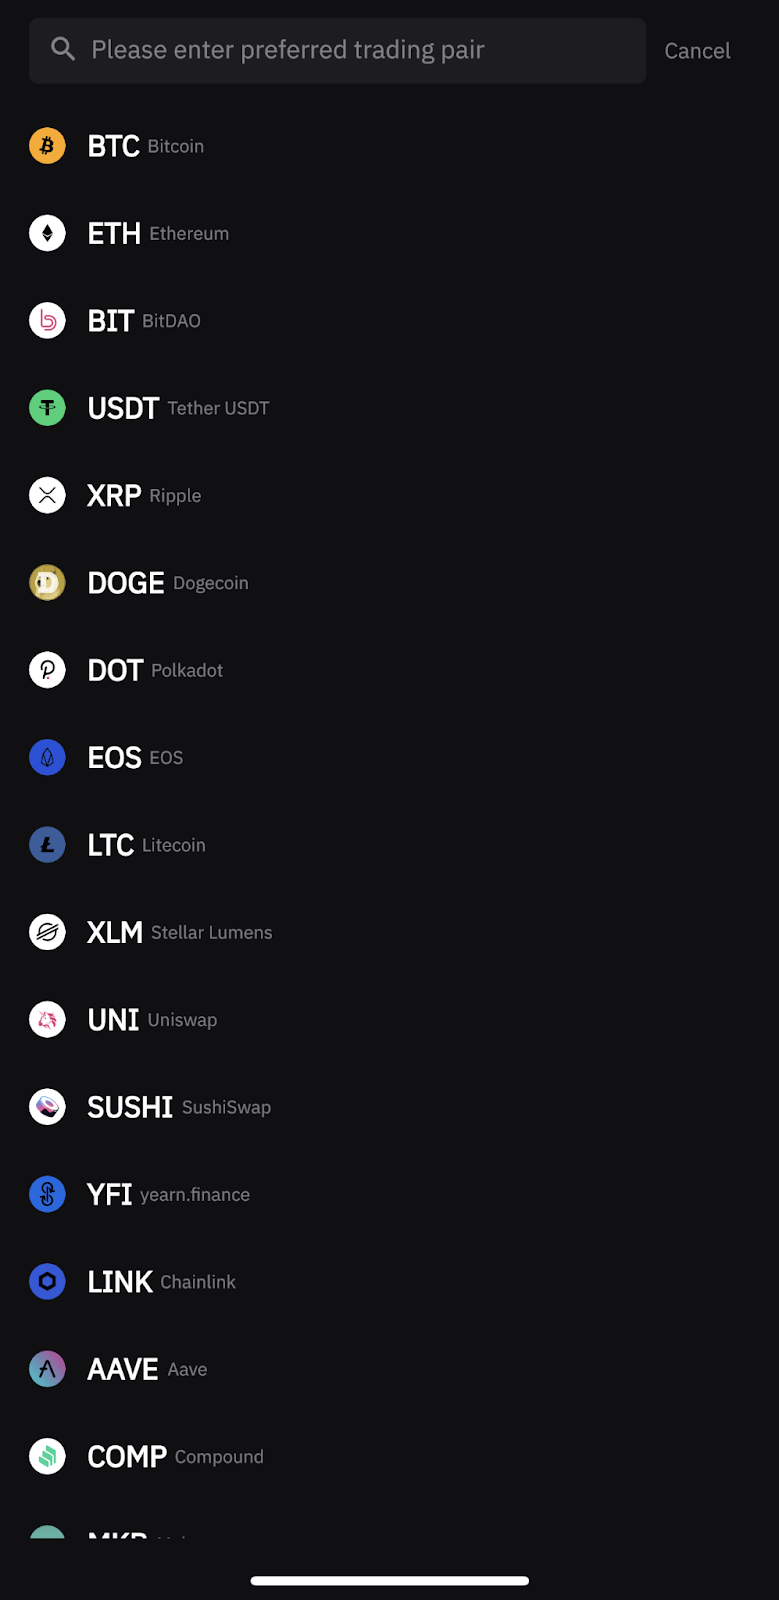
Step 2: Select the coin that you would like to deposit.
Step 3: Select the chain type for the coin that you would like to deposit. Then, make sure that the Deposits auto-channeled to the field that is indicated as Derivatives.
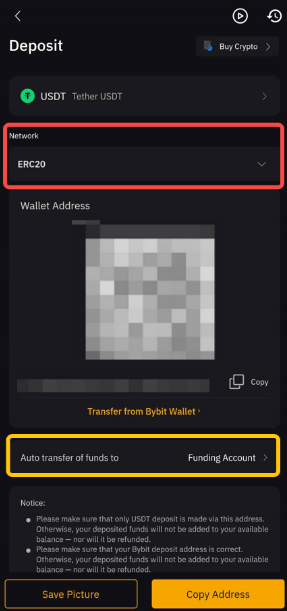
Step 4: Once you’ve confirmed the details, scan the QR code or copy the deposit address and use it as the destination address.
Chapter 2b: Buying Crypto on Bybit
Don’t have any funds in your external crypto wallet? No worries — because you can easily purchase crypto on Bybit using the following four channels.
Buying Crypto With Credit/Debit Card Payment
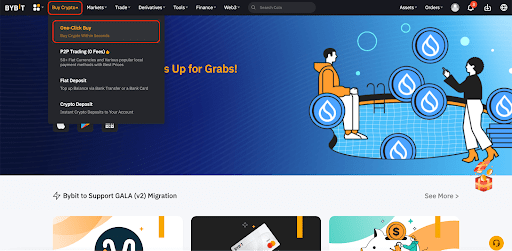
Step 1: After you’ve logged into your Bybit account, hover your cursor over the Buy Crypto tab on the top left corner of the Bybit home page and click on One-Click Buy.
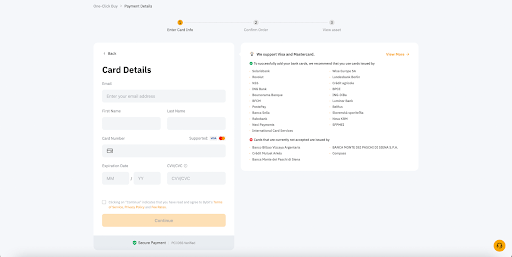
Step 2: Click on Add Card and input your credit/debit card information.
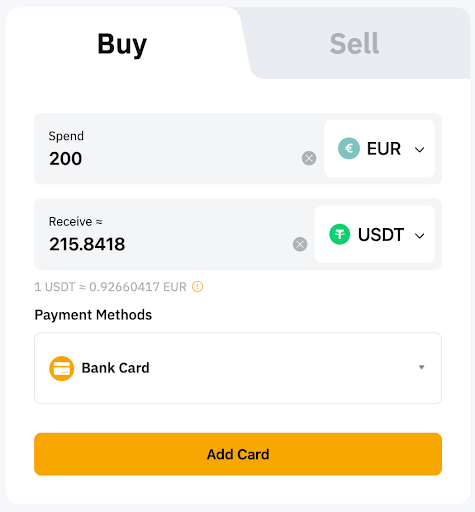
Step 3: After you’ve added your credit/debit card, select the fiat currency that you would like to pay with. Then, select the coin that you would like to receive.
Step 4: Input the amount that you would like to purchase and select the credit/debit card you’ve added. Then, click on Buy With.
Step 5: You’ll be asked to verify your purchase. If the details are correct, you may proceed to click on Confirm.
Step 6: The card payment will be processed and you may be prompted to key in a one-time password or confirm the transaction from your bank app.
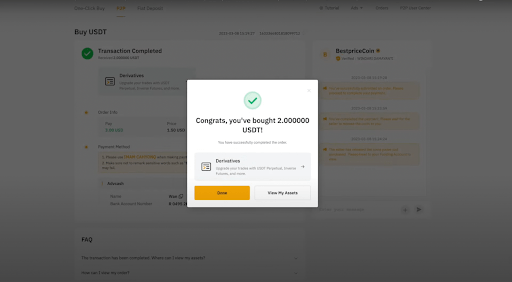
Step 7: Once the transaction is completed, you can click on View Asset to check your balance.
Buying Crypto With Third-Party Payment
If you would like to purchase crypto using a third-party payment method, navigate to the One-Click Buypage and choose any of the available third-party payment methods under the drop-down menu. You will then be redirected to the third-party website to continue the purchase process.
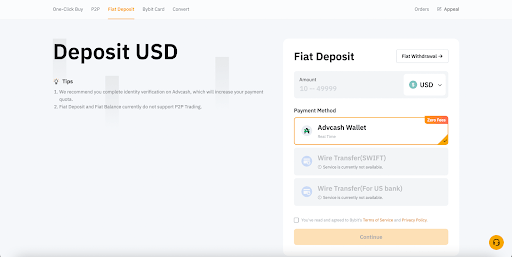
Buying Crypto With Fiat Deposit
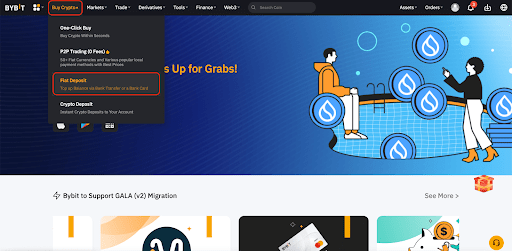
Interested in depositing fiat currencies directly into your Bybit account? Simply navigate to the Fiat Deposit page by hovering your cursor over the Buy Crypto tab. Then, select your preferred fiat currency and input the amount you would like to deposit. Click on Continue to proceed with the purchase process.
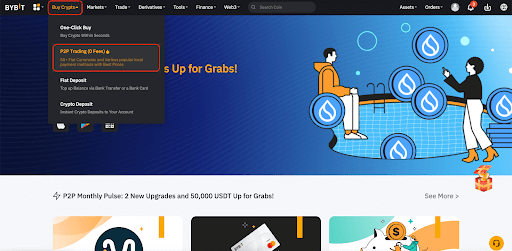
Buying Crypto via P2P Trading
Step 1: After you’re logged into your Bybit account, hover your cursor over the Buy Crypto tab on the top left corner of the Bybit home page and click on P2P Trading.
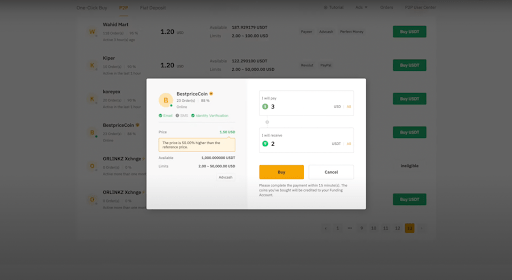
Step 2: On the Buy page, you can enter your preferred criteria for Amount, Fiat Currencies or Payment Methods, based on your transaction needs, to filter advertisers.
Step 3: Choose the advertiser you want and click on Buy USDT.
Step 4: A window will pop up and you may enter the amount of fiat you’re willing to pay, or the quantity of coins you would like to receive. Then, click on Buy to proceed.
Step 5: You’ll be redirected to the order page, and will have 15 minutes to transfer the money to the seller’s bank account. Please be sure all your details are correct before proceeding.
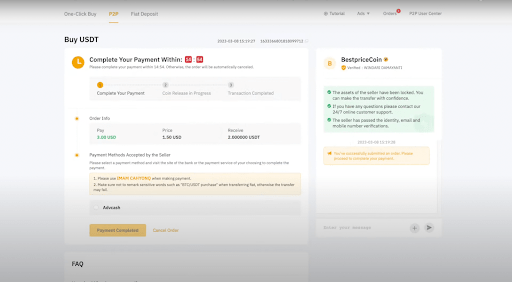
Step 6: Once you’ve completed the payment, click on Payment Completed.
Step 7: When the seller successfully releases the coins to you, you can click on Check Asset to view them. However, if the seller fails to release the funds to you after 10 minutes, you can click on Submit Appeal and our customer support team will reach out to you.
Chapter 3: Understanding the Bybit Derivatives Trading Interface
Derivatives trading involves buyers and sellers exchanging an underlying crypto asset at a predetermined price and date. Traders on Bybit can access a myriad of derivative products in order to bet on the price movement of cryptocurrencies without owning them.
This guide introduces you to the Bybit suite of derivative products, providing an all-access pass to the tools, strategies and insight you need to succeed with trading derivatives on the powerful and user-friendly Bybit platform.
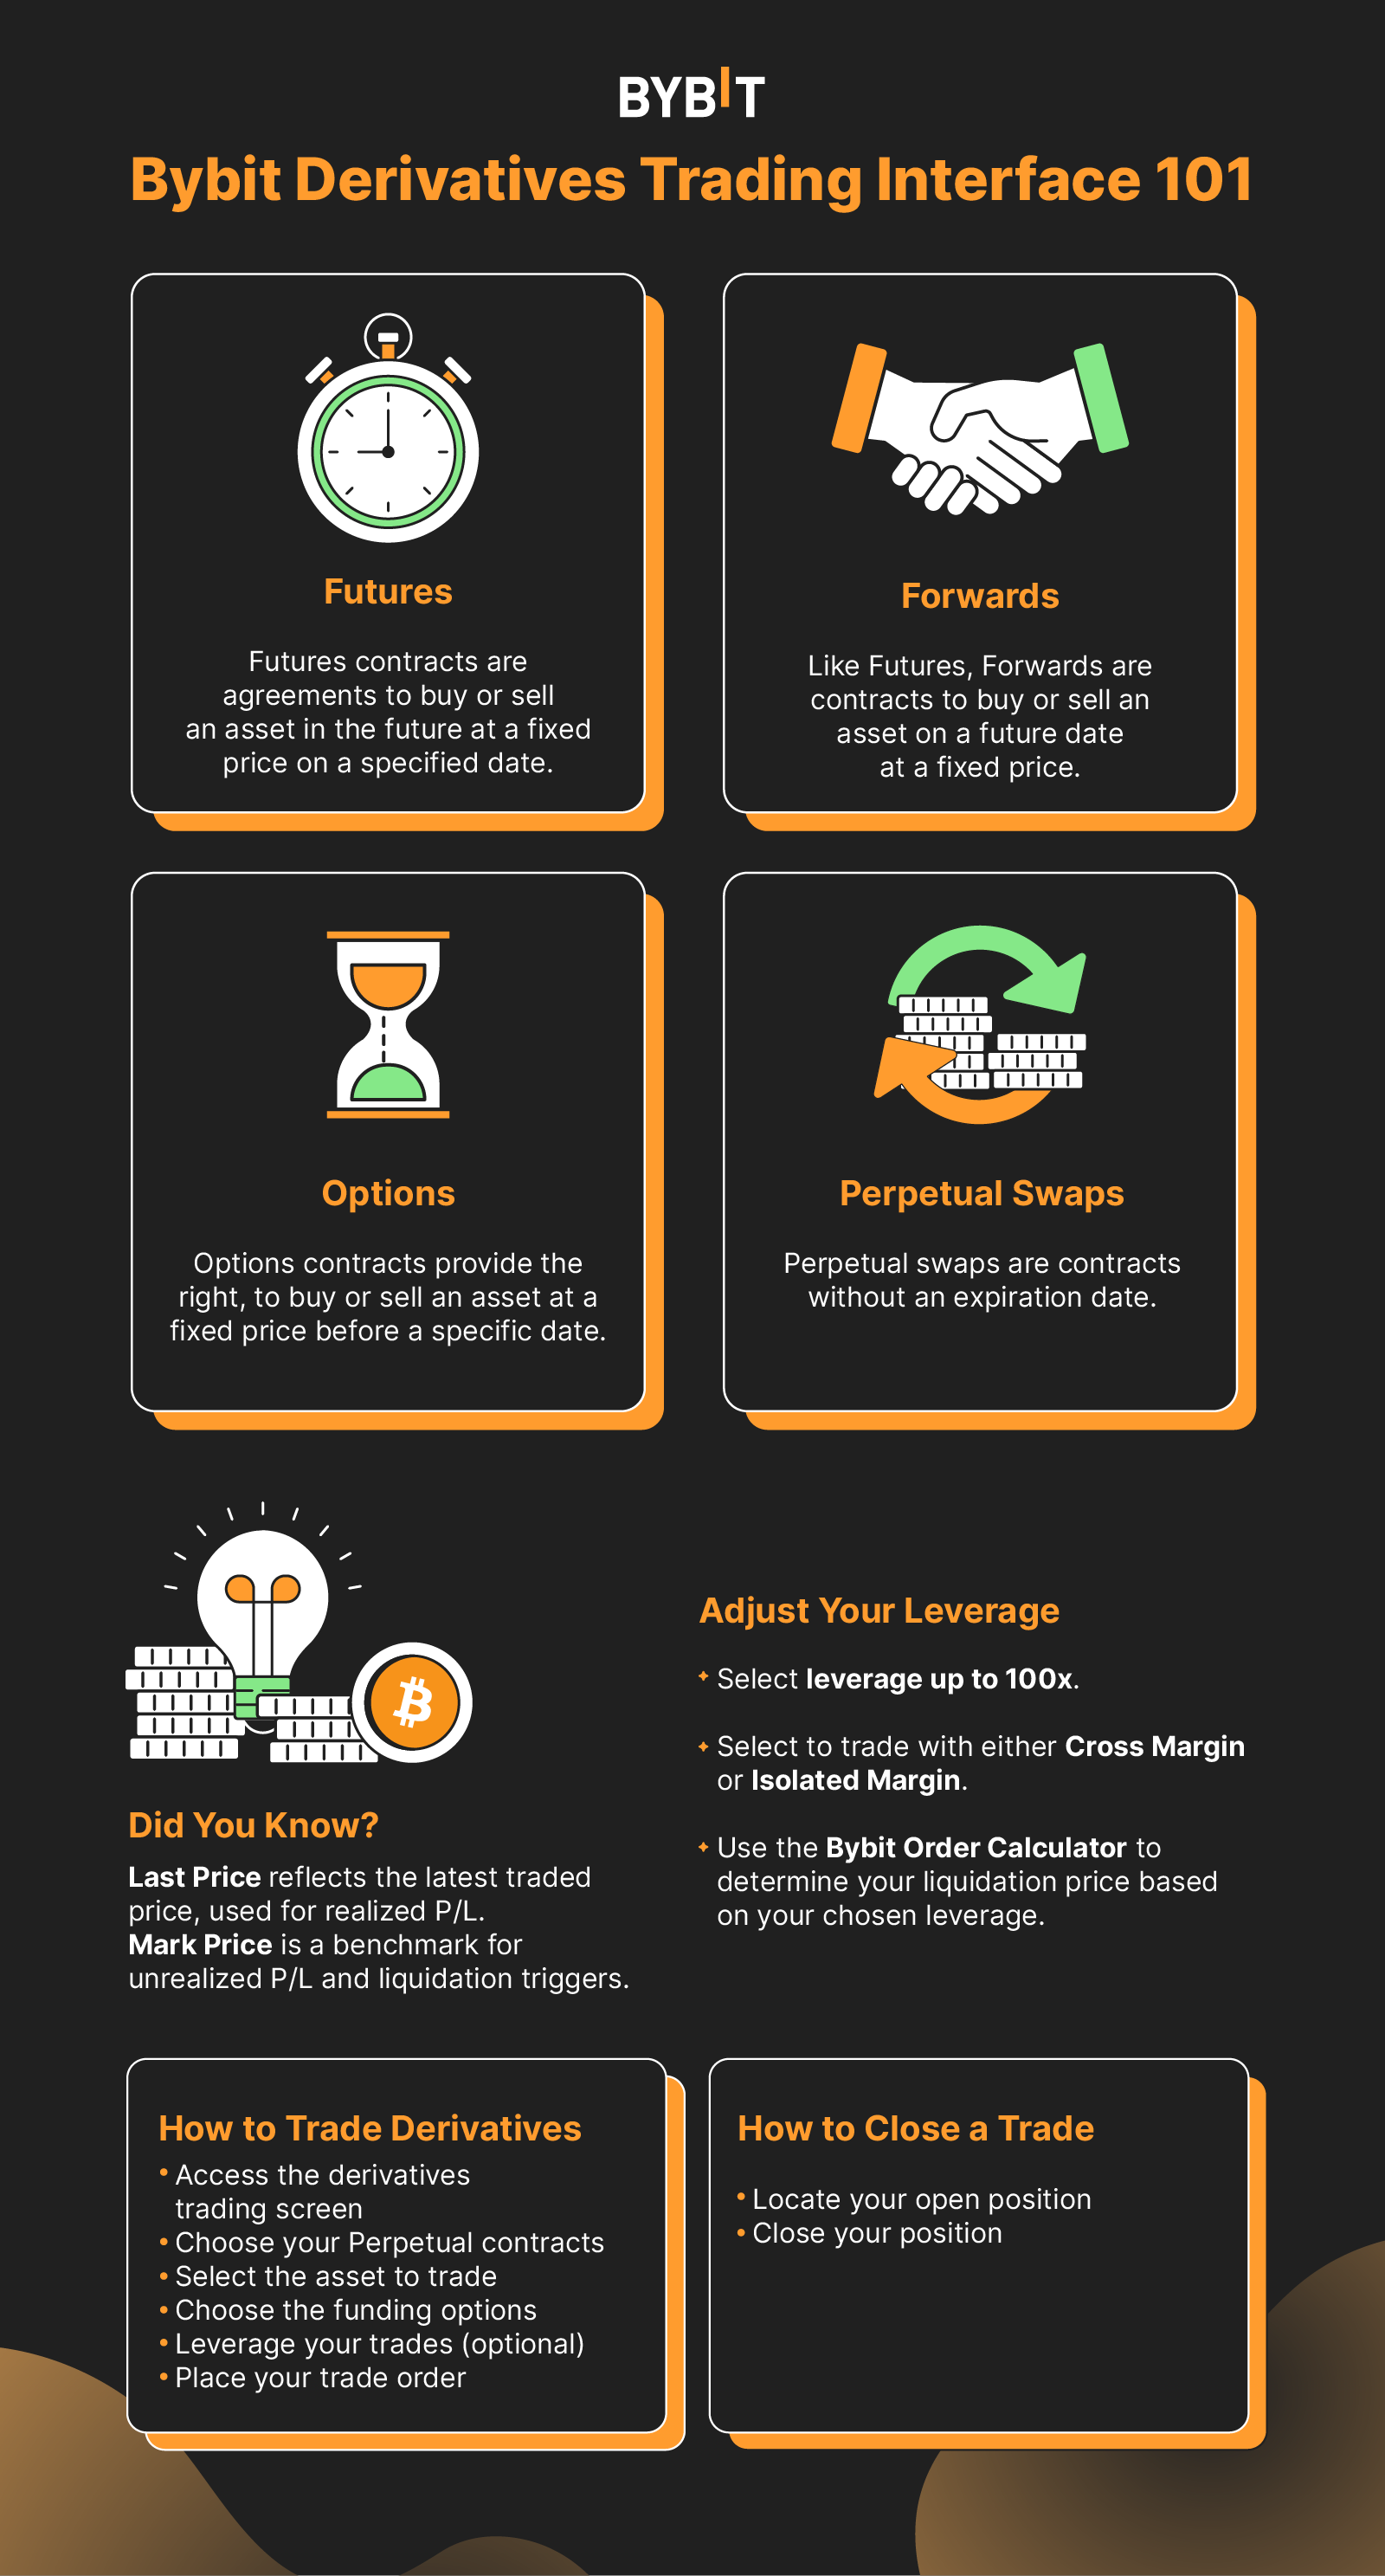
Chapter 3a: Types of Derivatives
There are a wide range of Bybit derivative products, including futures, forwards, options and perpetual swaps.
Futures: Futures contracts are standardized agreements to buy or sell an underlying asset at a predetermined price on an agreed-upon date in the future. They can be used for both hedging and speculation purposes.
Forwards: Similar to futures, forwards are contracts that involve an agreement to buy or sell an asset at a specific price on a future date. However, forwards are traded over-the-counter (OTC), rather than on centralized exchanges, which can make them less liquid than futures. They’re also more customizable and private in nature, typically tailored to meet the needs of the parties involved.
Learn more: Differences Between Futures and Forwards Contracts
Options: Options contracts give the holder the right, but not the obligation, to buy or sell an underlying asset at a specified price, on or before a specific date. Beginners typically start with one of two types of options — call options, which give the holder the right to buy an asset, and put options, which provide the holder the right to sell it.
Perpetual Swaps: Perpetual swaps closely resemble futures contracts, except that they don’t have an expiration date. They allow traders to hold positions indefinitely, while periodically paying or receiving funding fees to maintain their positions.
Chapter 3b: How to Trade Derivatives on Bybit
Bybit allows you to trade futures, options and perpetual contracts with up to 100x leverage.
Step 1: Access the derivatives trading screen
From any page on the Bybit platform, navigate to the top of the page and click on Derivatives to access the derivatives trading screen.
Step 2: Choose between USDT Perpetual, USDC Contracts, USDC Options and Inverse Contract
For example, you can click on USDT Perpetual if you want to trade using a stablecoin such as USDT or USDC.
Step 3: Select the asset to trade
Under USDT Perpetual, choose the asset you want to trade, such as BTC/USDT, by clicking on it. This will take you to the trading interface for that specific asset.
Step 4: Understand funding options for your trades
There are two ways to fund your position: Using a stablecoin (USDT or USDC), or cryptocurrencies (such as BTC) as collateral. Decide which option better suits your trading strategy and portfolio.
Step 5: Leverage your trades (optional)
While trading on Bybit, you can use leverage to increase your potential gains (or losses).Decide whether or not you want to use leverage, and, if so, choose the appropriate leverage level based on the available margin.
Step 6: Place your trade order
Based on your analysis and strategy, enter your trade details in the order entry panel. Specify the order type, quantity, price and leverage (if applicable), and then click on either Buy/Long or Sell/Short to execute your trade.
Chapter 3c: Adjusting Your Leverage
If you opt to use leverage, here are the steps to take.
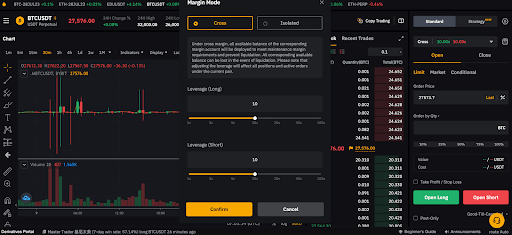
Step 1: Select your leverage
When trading futures on Bybit, you can choose to use no leverage (1x), or you can use leverage to increase your position size (2x, 4x, 5x, 6x, etc.). The higher the leverage, the larger your position size will be and the higher the potential risk and return.
Step 2: Choose between cross and isolated margin
With Bybit, you can select either cross margin or isolated margin. Cross margin uses all the collateral across your derivatives trading account to fund potential losses, while isolated margin isolates the collateral for each individual position. Most traders prefer cross margin in order to use capital efficiently.
Learn more: Understanding How Cross Margin and Isolated Margin Work
Step 3: Determine your desired leverage
Use the slider in the leverage window to select your desired leverage and click on Confirm. Due to the inherent risks, many traders use leverage of 10x or below. Be sure to set up stop-loss orders, and adjust your leverage according to your risk tolerance.
Step 4: Use the order calculator
Bybit provides an order calculator that helps you determine your liquidation price, based on your chosen leverage. Ensure that your stop-loss order is above the liquidation price if you’re long to avoid getting wiped out by a slight price movement.
Learn More: How Does Liquidation Price Work on Bybit?
Step 5: Place a limit order
Once you’ve determined your leverage and set your stop loss, you can place a limit order on Bybit.
Learn more: Everything About Bybit Limit Order, Market Order and Conditional Order
Chapter 3d: Last Price vs. Mark Price
The last traded price (aka last price) is the latest price at which a derivatives contract has been traded, reflecting the most current market conditions. It’s used to determine a trade's realized profit and loss. On the other hand, the mark price is a benchmark for the value of the underlying cryptocurrency, used to calculate the unrealized profit and loss of a trade and to trigger liquidation in extreme market volatility.
Traders on Bybit can set their take profit (TP) or stop loss (SL) orders using either the last price or mark price as the trigger price. Understanding the differences between these two prices is essential for assessing the risk involved in trades and for making calculated decisions while trading crypto derivatives.
Learn more: Understanding the Difference Between Mark Price and Last Price
Chapter 3e: How to Close a Derivatives Trade on Bybit
Closing a derivatives trade on Bybit is a straightforward process.
Step 1: Locate your open position
Scroll down to the Positions tab below the chart to find your open position(s). Identify the position you want to close.
Step 2: Close your position
There are two primary methods for closing your position on Bybit:
Market Order: To close your position around current market prices, click on the Market button next to the position you want to close. A pop-up window will appear, asking you to confirm the action. Click on Confirm, and your trade will be executed at available market pricing.
Limit Order: To close your position at a specific price, click on the Close By Limit button next to the position. A pop-up window will appear, allowing you to set your desired closing price. Enter the price at which you'd like to close the position, and click on Confirm. Your position will close once the market reaches your specified price.
Start Trading Bybit Derivatives
Chapter 4: Derivatives Trading Tools on Bybit
Bybit offers a wide range of advanced derivatives trading tools to enhance your trading experience and help you stay ahead of the curve.
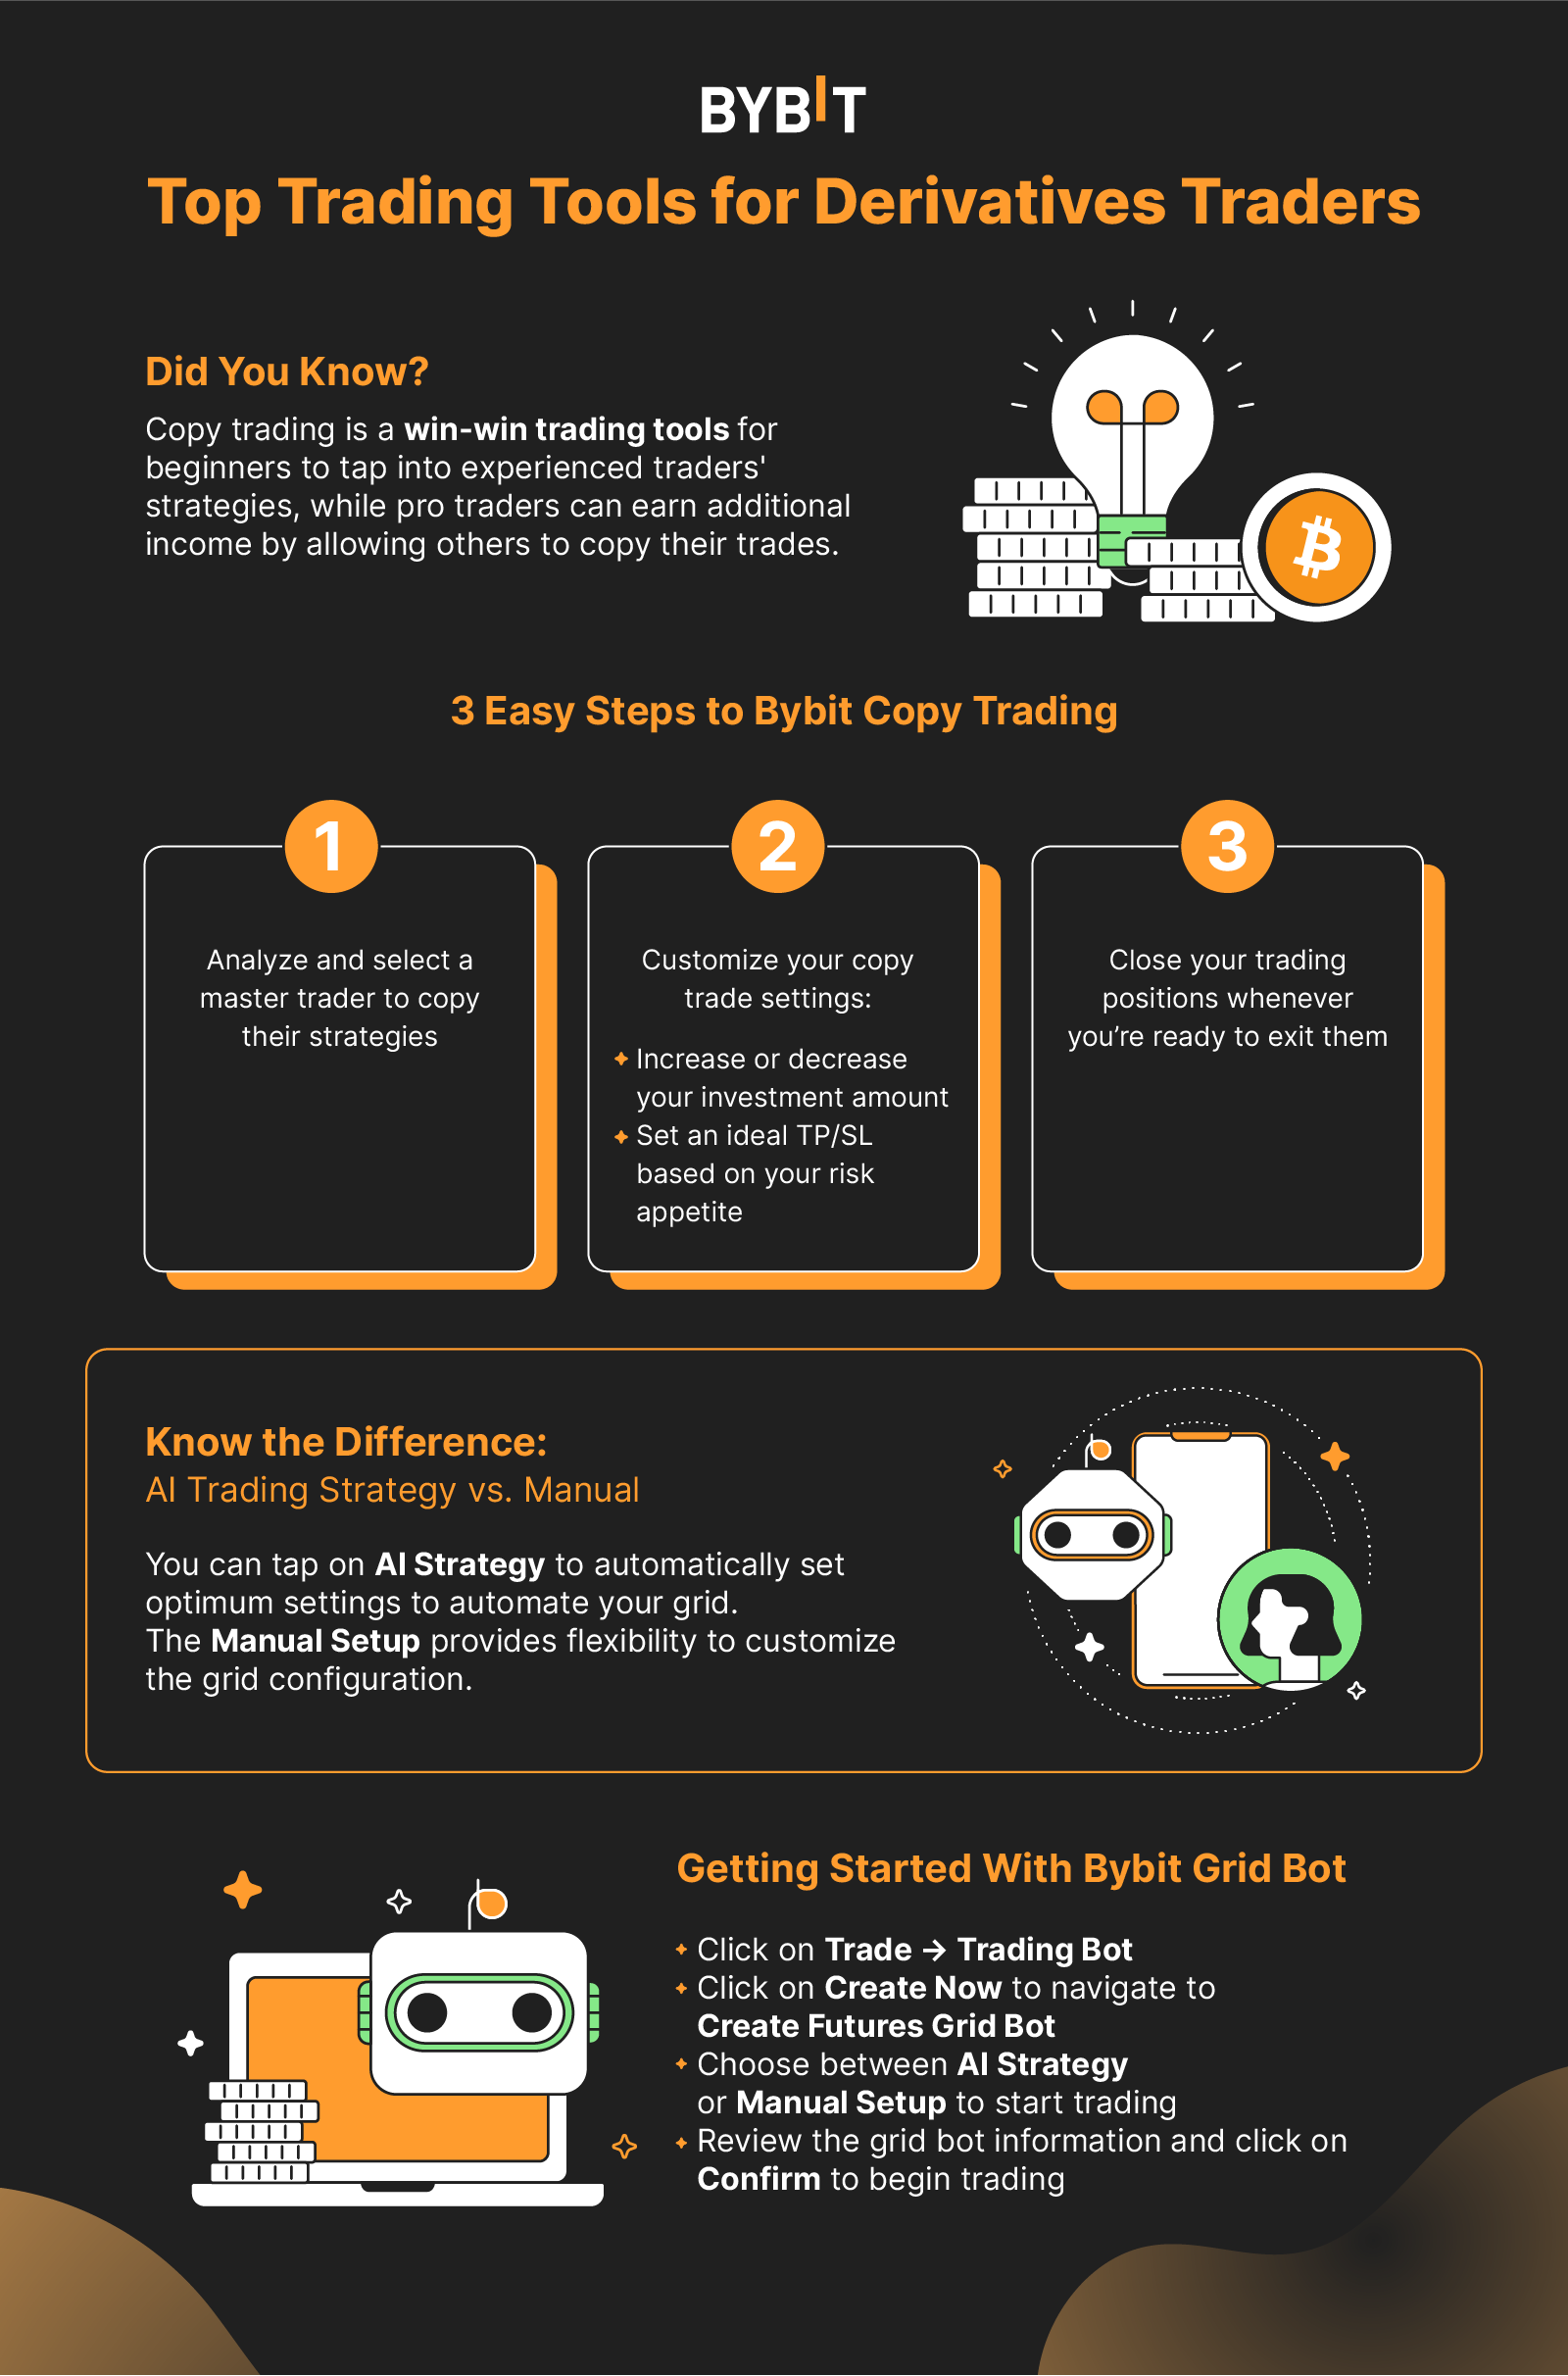
Chapter 4a: Copy Trading
Derivatives copy trading has become increasingly popular among crypto traders, as it allows them to follow and replicate the trading strategies of experienced traders, known as Master Traders.
Here are the steps to start copying your first derivatives trade on Bybit.
Copying a Master Trader
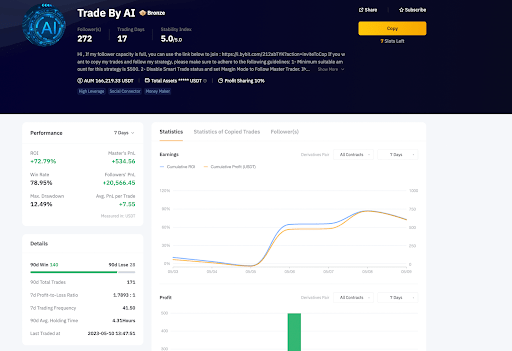
Note: This is just an example of a master trader’s user profile on Bybit, and is not an endorsement.
Go to the Copy Trading page by clickingon Tools → Copy Trading in the navigation bar.
Choose a Master Trader by clicking on Copy at the bottom of their card. You can copy up to 10 Master Traders simultaneously.
Set your Copy Mode (Smart Copy Mode or Advanced Copy Mode), and configure your copy trade settings.
Check the Agreement Acknowledgment box and click on Copy Now to start following your chosen Master Trader(s).
Editing Your Derivatives Copy Trade Settings

Click on My Copy Trading at the upper right corner of the Master Trader portfolio page to access the User Center.
Click on the Details of your respective Master Trader.
Adjust your CSL (Copy Stop Loss) and other advanced settings under the Copy Trading Settings.
Increasing & Decreasing Your Investment Amount:
To increase your investment amount, go to User Center → Master Traders, and click on Increase Investment under the respective Master Trader.
To decrease your investment amount, go to User Center → Master Traders → Details, then click on More Settings → Reduce Investment, and enter the amount you'd like to withdraw from the investment.
Setting TP/SL:
Access the User Center and navigate to Orders.
Click on Set TP/SL and enter your desired Take Profit or Stop Loss price. You can also choose the reference price to trigger your TP/SL.
Closing Positions:
To close an individual order manually, go to User Center → Orders → Copy Trades, and click on Close to close the order at the market price.
To close all positions under one Master Trader, go to User Center → Master Trader → Current Copy Trades, click on the Details of the respective Master Trader, and click on Close All to exit the entire position at the market price.
Chapter 4b: Futures Grid Bot
Bybit's Futures Grid Bot enables you to harness the power of AI to optimize your trading. Here’s a step-by-step breakdown for setting up your first Futures Grid Bot.
Trading via Trading Bot Page
Click on Trade → Trading Bot in the navigation bar to access the Bybit Trading Bot page.
Click on Create Now to navigate to the Create Futures Grid Bot page (maximum 50 bots).
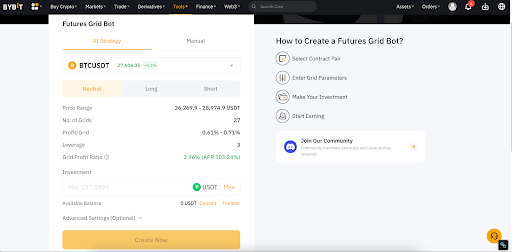
Choose between AI Strategy or Manual setup
AI Strategy: Select derivatives trading pair, order direction (Neutral, Long or Short) and total investment amount. Optionally, set Take Profit and Stop Loss ratios.
Manual: Select derivatives trading pair, order direction, price range, number of grids and leverage. Enter the investment amount and, optionally, set Take Profit and Stop Loss ratios.
Review your grid bot information and click on Confirm to start trading.
Trading via Derivatives Trading Page
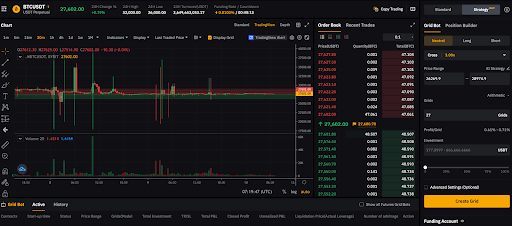
Click on Derivatives→ USDT Perpetual in the navigation bar and select the trading pair to access the USDT Perpetual Trading page.
Choose Strategy in the order zone on the right side of the page.
Create the Futures Grid Bot using AI Strategy or Manual setup
AI Strategy: Select order direction (Neutral, Long or Short) and click on AI Strategy. Enter the investment amount and, optionally, set Take Profit and Stop Loss ratios.
Manual: Select order direction and set leverage, price range and number of grids. Enter the investment amount and, optionally, set Take Profit and Stop Loss ratios.
Review your grid bot information and click on Confirm to start trading.
After creating the bot, you can view active or closed bot details under the Active or History tabs. Adjust the investment amount and/or add TP/SL to positions as needed. Note that additional investment only helps to maintain your position to avoid liquidation, but it does not reset Grid Bot parameters.
Chapter 5: How to Make a Withdrawal From Bybit

After making your profits on Bybit, it’s time to withdraw them. Here’s how you can do so.
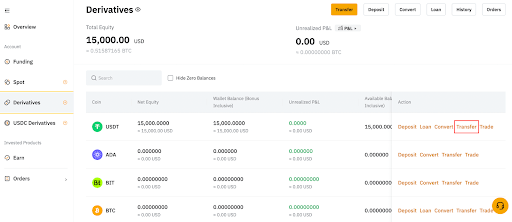
Step 1: Click on Assets at the top right-hand corner of the home page and select Derivatives on the drop-down list.
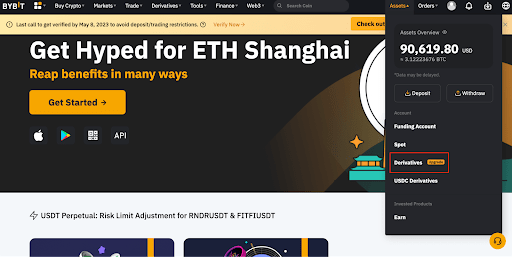
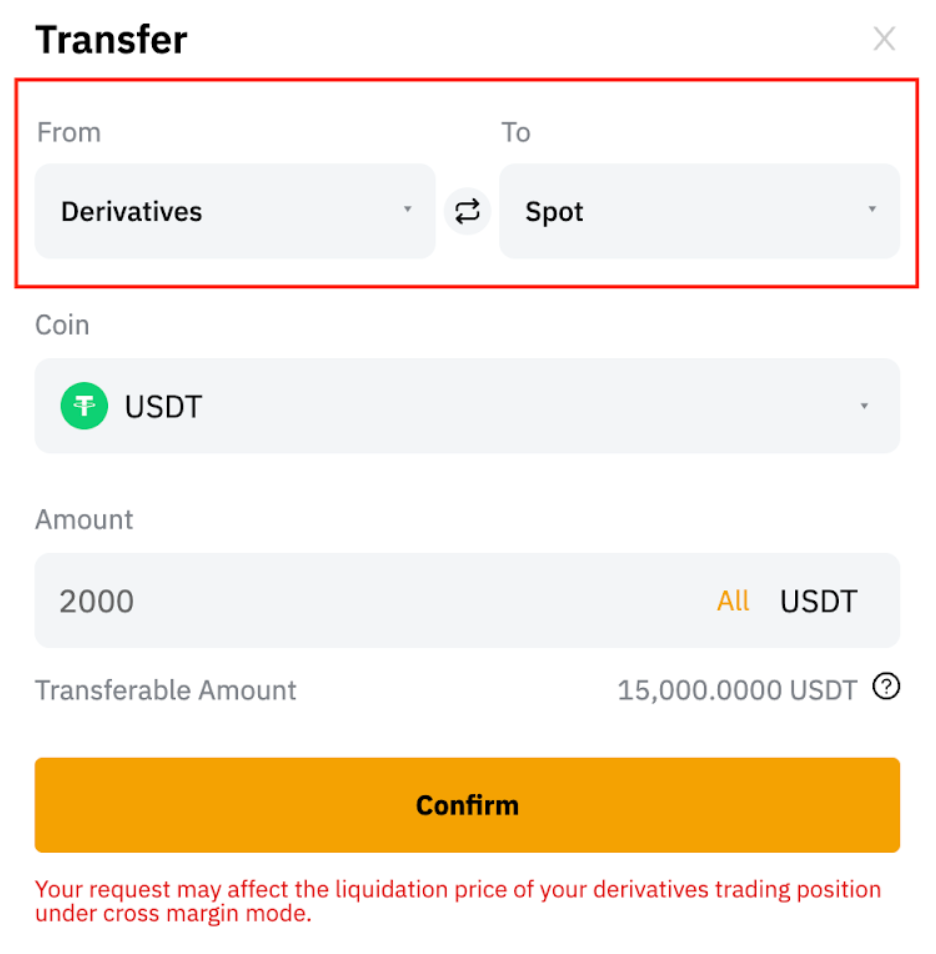
Step 2: Head to your selected asset (e.g., USDT) and then click onTransfer to move the USDT in your Derivatives account to your Spot account, as withdrawals can only be performed via your Spot account.
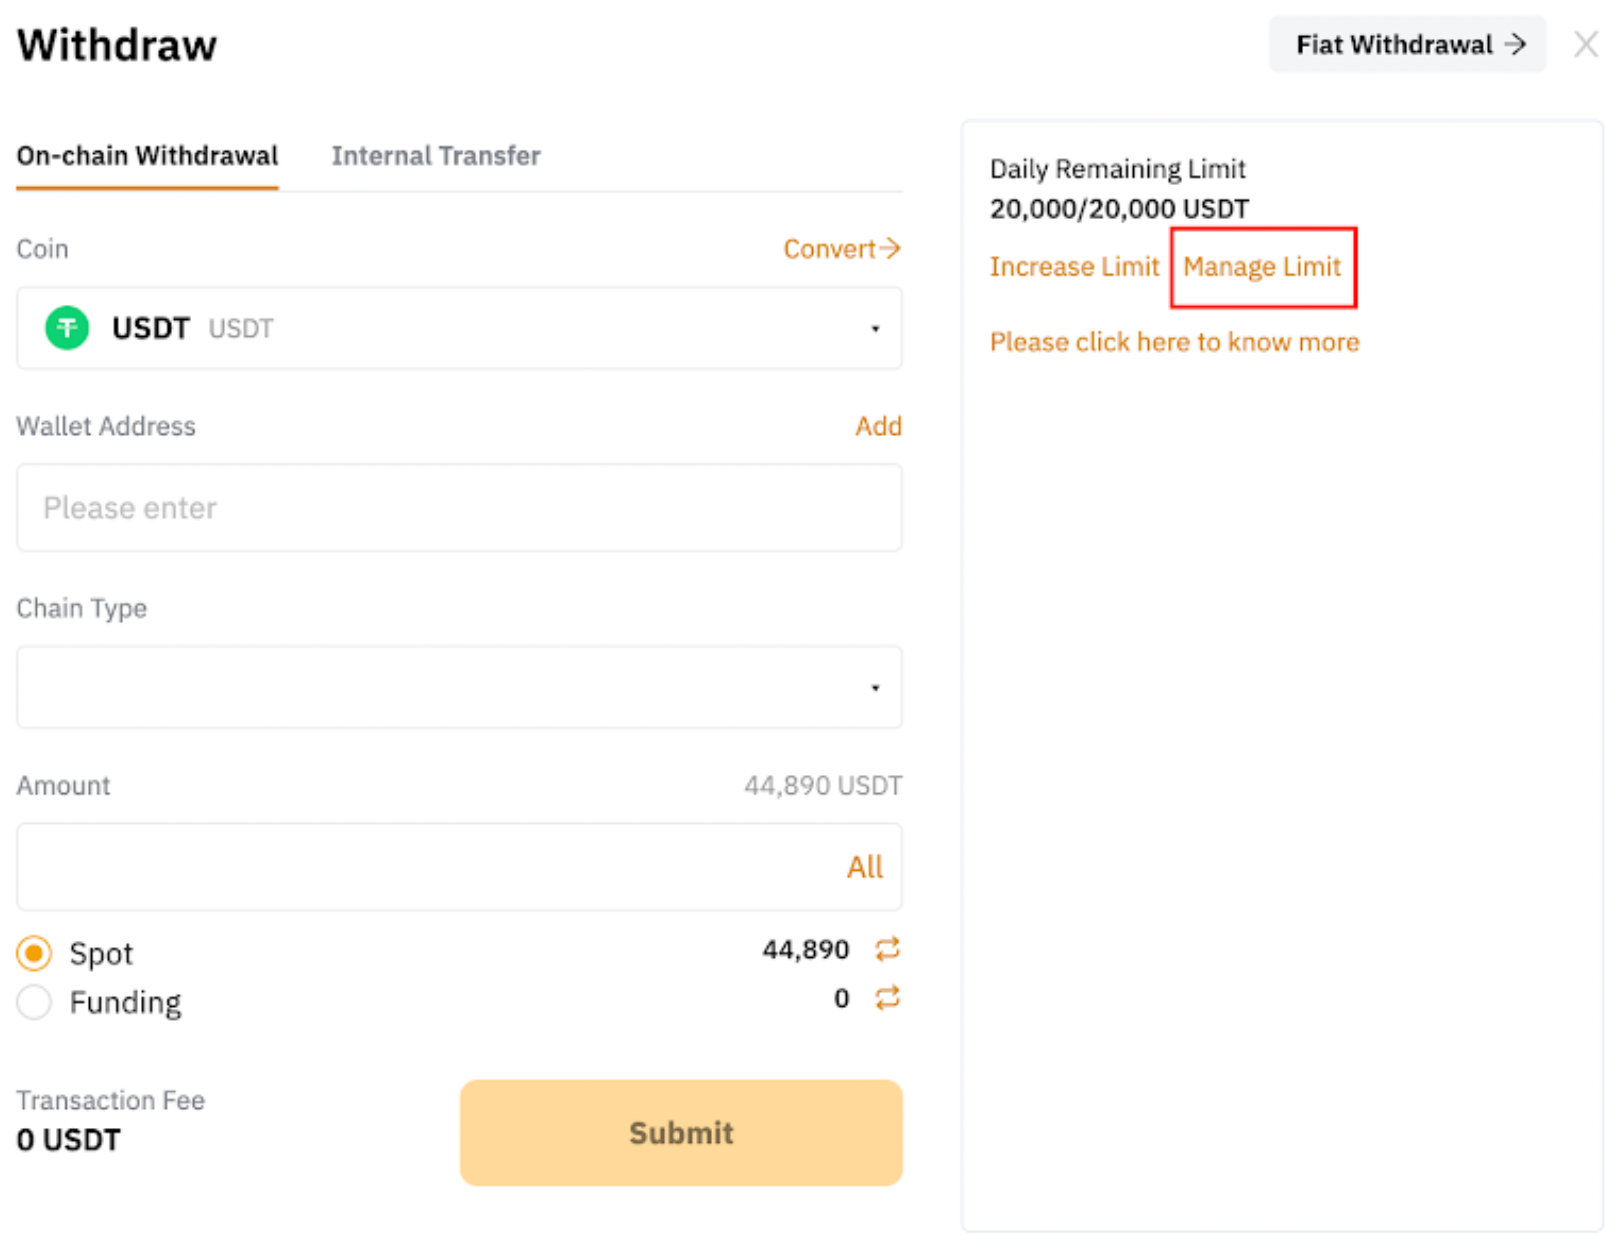
Step 3: Before submitting a withdrawal request, please ensure you’ve linked your withdrawal wallet address to your Bybit account. If you haven’t added a withdrawal wallet address yet, please click on Add to set it.
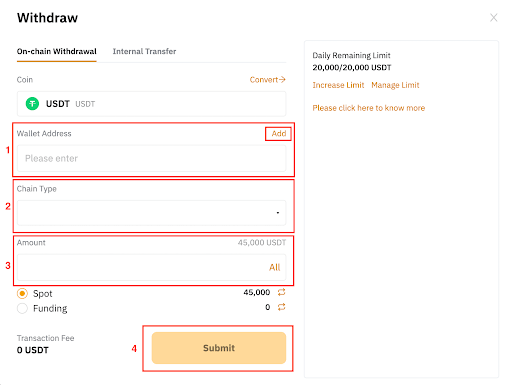
Step 4: Select your Chain Type.
Step 5: Click on Wallet Address and select the address of your receiving wallet
Enter the amount you want to withdraw, or click on the All button to make a complete withdrawal, and then click on Confirm.
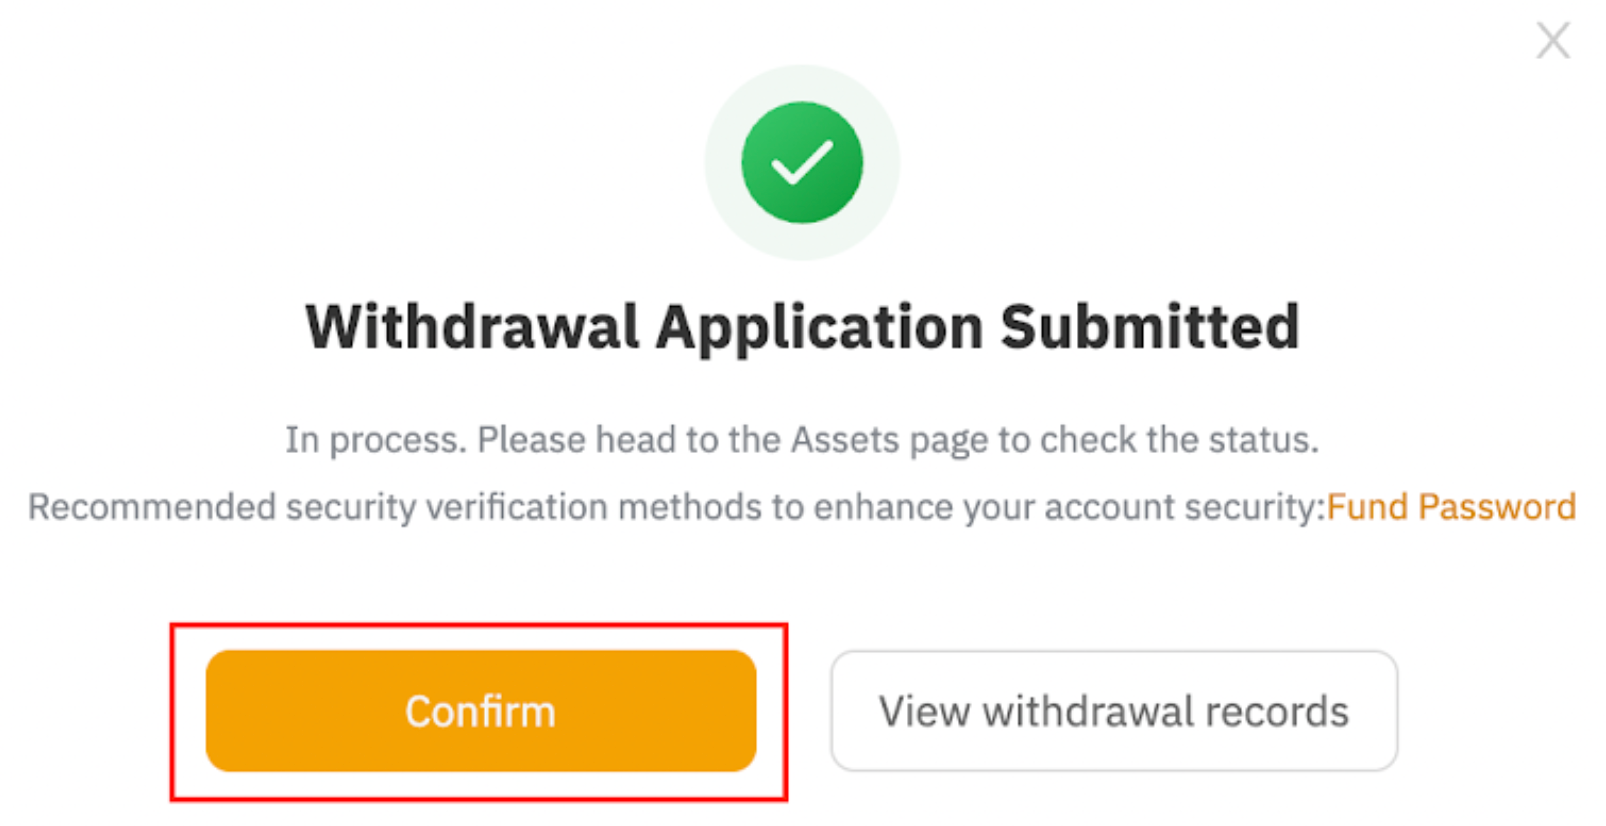
Step 6: A Confirm to Withdraw pop-up window will appear. Click on Submit to confirm your withdrawal and proceed with the security verification process, and then click on Confirm to confirm your withdrawal.
Please note that there is a minimum withdrawal amount indicated in the withdrawal window, and a daily and monthly withdrawal limit applies according to your VIP and KYC levels. While VIP users are automatically given higher withdrawal limits, you can manually change your limit by clicking on Manage Limit in the withdrawal window.
Chapter 6: Managing Risks When Trading Derivatives
As derivatives trading allow traders to leverage their positions, they run a higher risk of having those positions liquidated. Hence, derivatives trading is better suited for traders with a high-risk appetite. You can still manage your risks in many ways, such as developing a trading plan, using risk management strategies and implementing stop-loss orders. But how can you determine if your position is at risk of being liquidated in the first place?
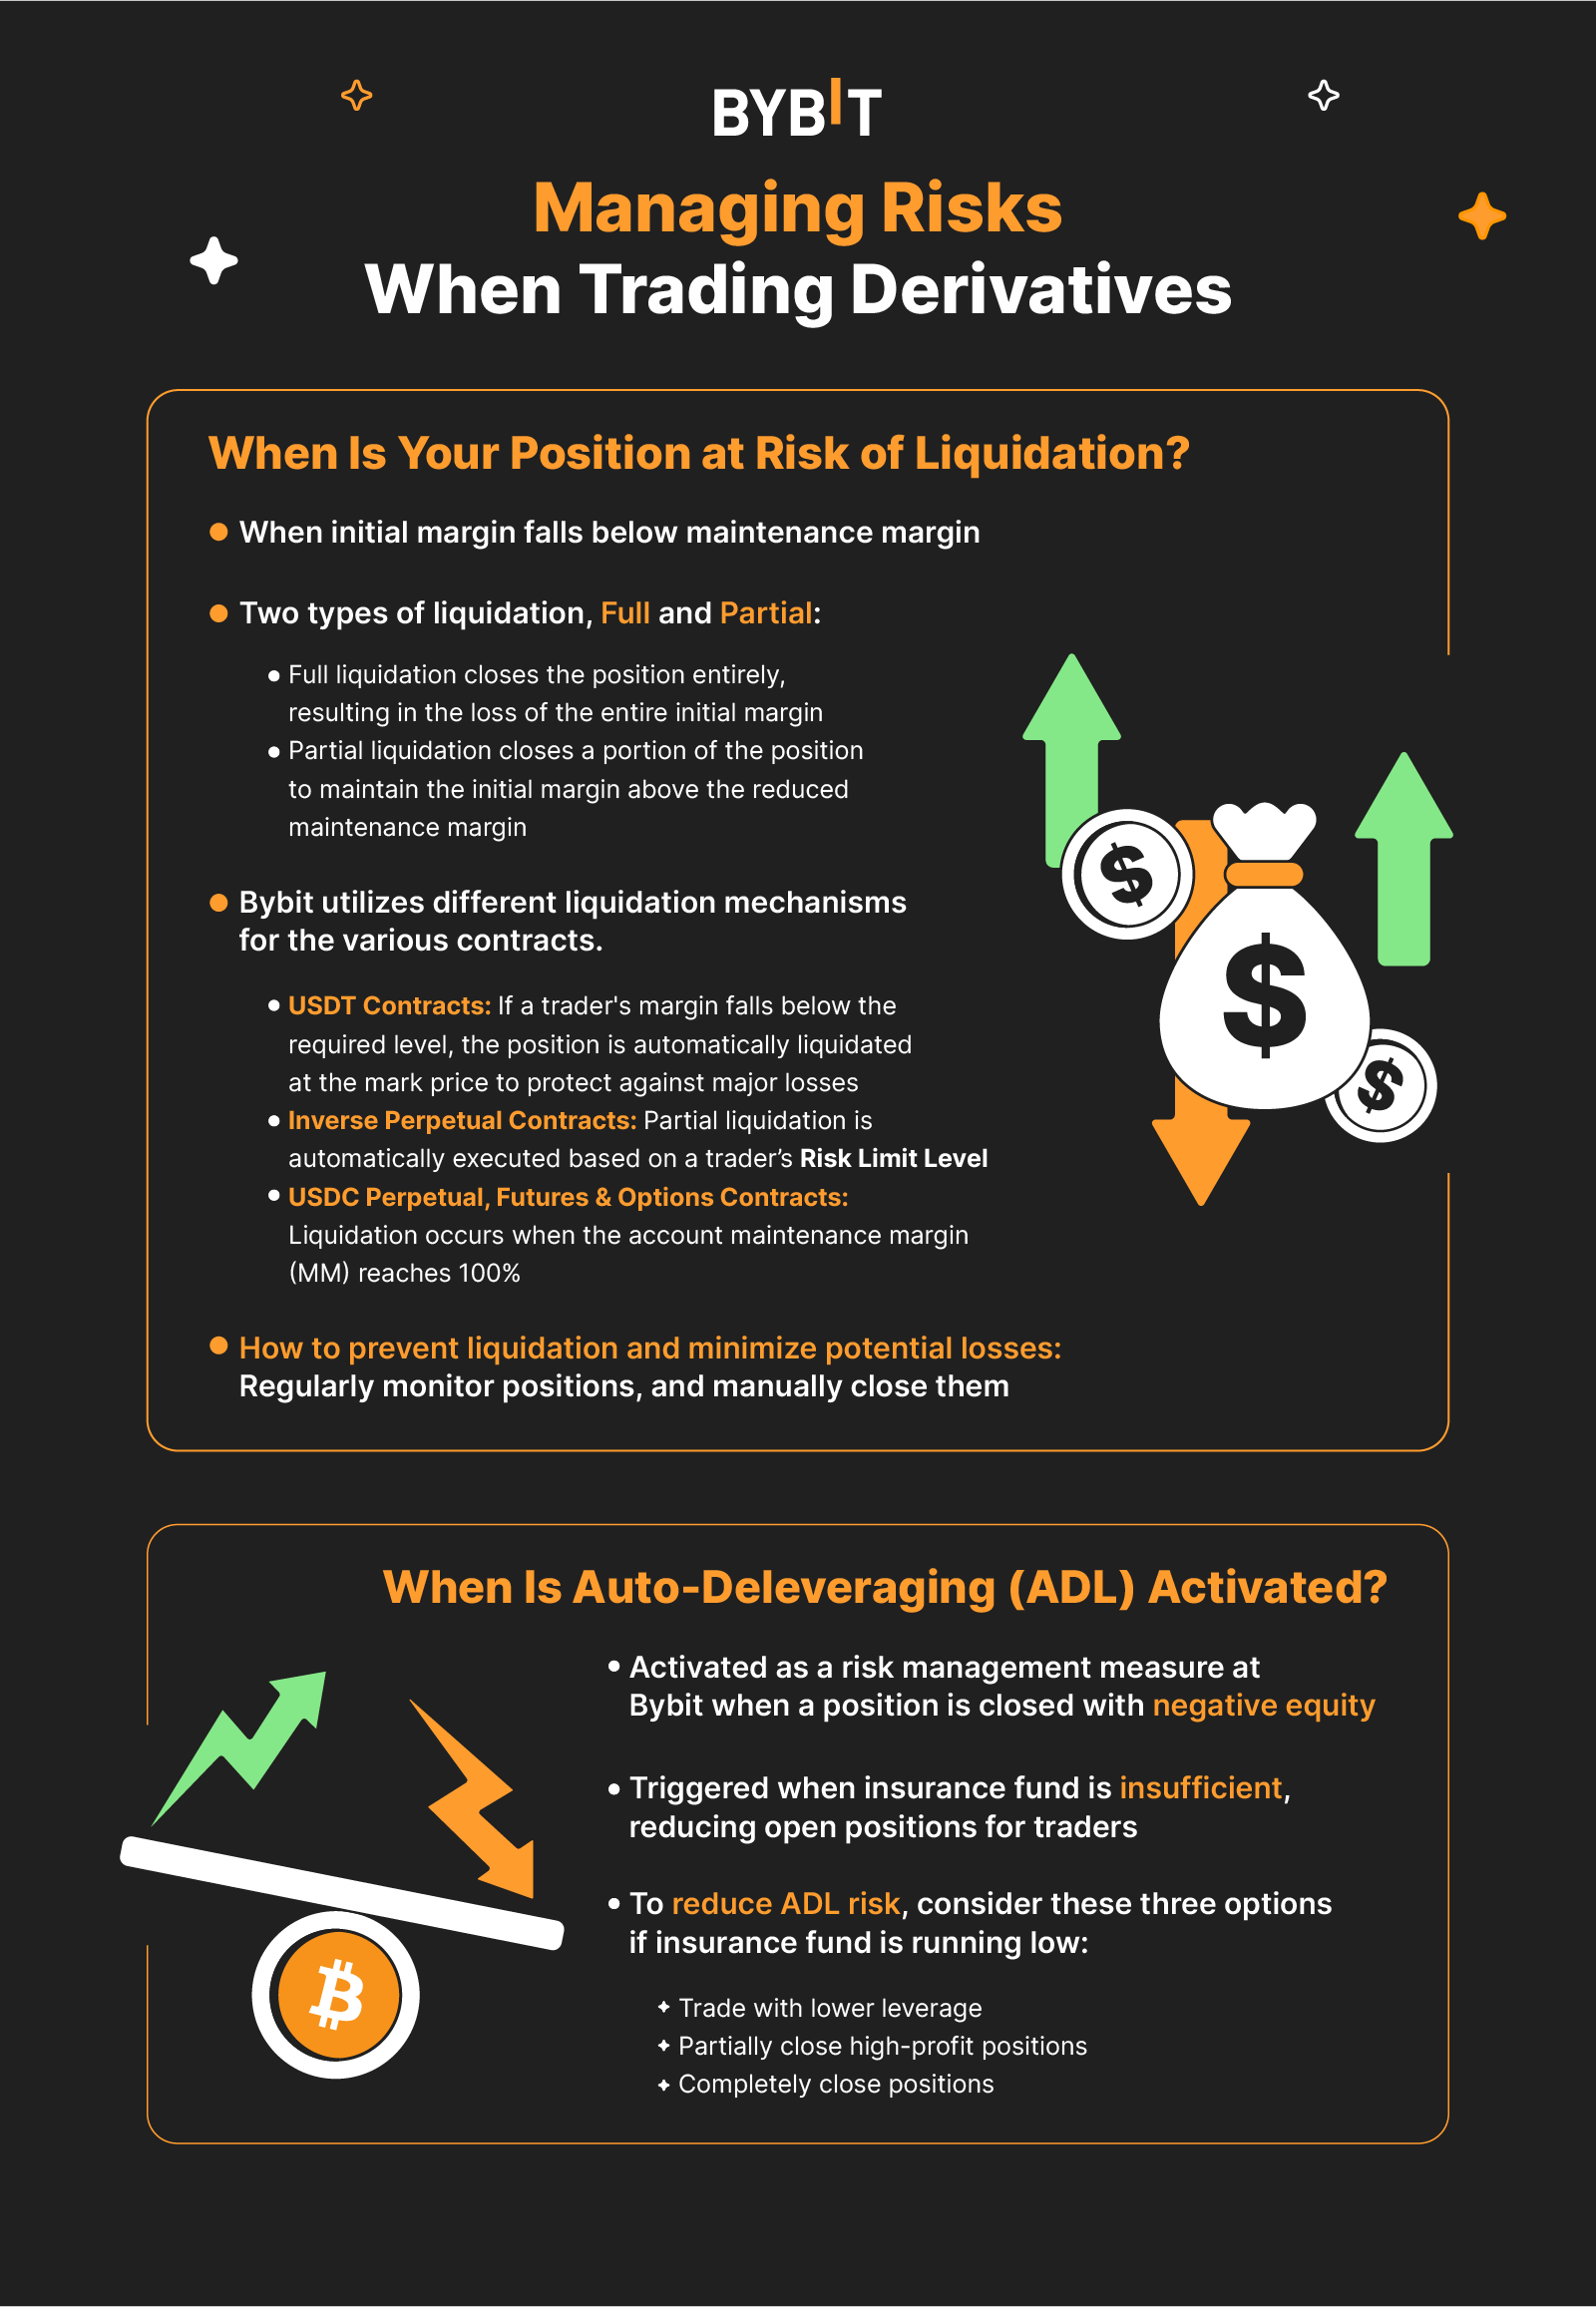
Chapter 6a: When Is Your Position at Risk of Getting Liquidated?
When your initial margin drops below the maintenance margin, which is the minimum margin requirement for your leveraged position, liquidation will occur. This typically happens when the underlying asset suffers a sudden price drop.
Liquidation occurs when the initial margin drops below the maintenance margin. This usually happens due to a sudden price drop in the underlying asset. There are two types of liquidation: full liquidation and partial liquidation. Full liquidation closes the position entirely, resulting in the trader losing their entire initial margin. On the other hand, partial liquidation closes a position partially to ensure that the initial margin stays above the reduced maintenance margin. Partial liquidation is helpful, as you’ll be less likely to lose your entire position.
Bybit utilizes different liquidation mechanisms for various contracts.
USDT Contracts: Bybit employs the mark price mechanism to mitigate the risk of liquidation stemming from low liquidity or market manipulation. If your margin falls below the required level, your position will be automatically liquidated at the mark price to protect against major losses.
In isolated margin mode, your positions will be liquidated when the margin reaches the maintenance level. On the other hand, in cross margin mode, liquidation occurs when your available balance reaches zero in addition to your margin reaching the maintenance level. Note that having larger positions can potentially increase your margin requirement.
Learn more: Liquidation Process (USDT Contract)
Inverse Perpetual Contracts: Bybit automatically executes a partial liquidation based on a trader’s Risk Limit Level. If you’re using the lowest risk limit, all your active orders will be canceled and settled at the bankruptcy price. If you’re trading at a higher risk limit, however, the liquidation engine will sequentially reduce the risk limit and ultimately cancel all of your open orders, settling them at the bankruptcy price.
Learn more: Liquidation Process (Inverse Contract)
USDC Perpetual & Futures: Liquidation occurs when your account maintenance margin (MM) reaches 100%. For USDC Perpetuals, the liquidation process varies based on the chosen margin mode — cross margin or portfolio margin. Note that a USDC Futures contract can only be executed in the Unified Trading Account, in which the liquidation process also differs across the two margin modes.
Learn more: Liquidation Process (USDC Perpetual & Futures)
USDC Options: Just as with USDC Perpetual & Futures contracts, liquidation occurs when your account MM hits 100%, with the process differing according to the margins modes — regular margin or portfolio margin.
Learn more: Liquidation Process (Options)
As all your open orders will be canceled in liquidation, it’s crucial to monitor your positions regularly. and manually close them if they’re close to being liquidated. This will help prevent liquidation, and minimize your potential losses.
Chapter 6b: When Is Auto-Deleveraging Activated?
At Bybit, auto-deleveraging (ADL) is initiated as a risk management mechanism when a position is closed with negative equity. If the system can close the position at a better price than the bankruptcy price, the remaining funds will be transferred to the insurance fund. However, if the position is closed at a price worse than the bankruptcy price, the losses will be covered using assets from the insurance fund.
In the event that the balance in the insurance fund is insufficient, the system will activate auto-deleveraging, resulting in open positions being reduced for traders. The higher your ADL ranking, the higher the possibility of your position(s) being auto-deleveraged, which eats into your profits.
Therefore, it’s recommended you maintain a lower ADL ranking by trading with low leverage when the insurance fund is dwindling rapidly. Otherwise, you can close your high-profit positions partially to decrease your position size (and your ADL risk), or close your position entirely if the insurance fund is running low.
#Bybit #TheCryptoArk